This recipe for No Bake Chocolate Chewies is a nod to those afternoons when I was a kid, sneaking into the kitchen to grab a cookie or two before dinner. There’s something about the way the chocolate melts just enough, sticky and rich, that instantly takes me back to lazy weekends and the smell of cocoa and butter filling the air.
What makes these treats special isn’t just their simplicity, but how they somehow capture the chaos and comfort of home. No oven, no fuss, just a bowl and a spoon—perfect for those days when I want something sweet but can’t be bothered with long waits or complicated steps.
This recipe is inspired by my grandma’s secret stash of childhood treats, where no-bake meant more time for stories and less for fussing in the kitchen.
A Childhood Secret in Every Bite
- Making these chews feels like a secret childhood ritual I still sneak into whenever I need a quick pick-me-up.
- I love how the gooey, chocolatey mess reminds me of lazy afternoons at my grandma’s kitchen table.
- There’s a strange comfort in how these treats come together with just a handful of ingredients and a little patience.
- Every time I make these, I’m transported back to the chaos and warmth of family gatherings and whispered stories.
- These no-bake chews are my go-to for when I crave something rich, simple, and a little nostalgic.
A Childhood Secret in Every Bite
- This recipe for No Bake Chocolate Chewies came from a moment of realizing how much I crave quick, honest treats that don’t demand a proper oven or intricate steps. One afternoon, I was knee-deep in chaos—kids arguing, laundry piling—and just wanted something sweet and satisfying. Stirring together these simple ingredients felt like a small act of rebellion against the busy mess around me.
- Every time I make these, I think of my early days tinkering in my tiny kitchen, trying to recreate the rich, sticky cookies I loved from childhood. It’s a reminder that sometimes, the best comfort lies in a handful of pantry staples and a little bit of patience. These chews are my go-to when I need a quick, honest fix of chocolate and nostalgia.
- heading
- story_type
Historical & Cultural Tidbits
- This recipe has roots in 1950s cookbooks, often shared at community bake sales as a quick, no-fuss treat.
- No Bake Chewies became popular during wartime rationing, when oven access was limited but chocolate and butter were still treasured ingredients.
- The chewy texture mimics traditional fudge but skips the lengthy process, making it a secret favorite among busy home cooks.
- Historically, recipes like these were passed down orally in neighborhoods, evolving with each generation’s pantry staples.
- The combination of cocoa and butter in these chews reflects a classic mid-century American sweet, loved for its simplicity and richness.
Ingredient breakdown
- Unsweetened cocoa powder: I love how it adds that deep, rich chocolate flavor and a hint of bitterness. If you prefer a milder taste, try Dutch-processed cocoa, but for that raw, intense cocoa punch, stick with natural unsweetened.
- Butter: It makes these chews melt-in-your-mouth creamy. Using salted butter adds a subtle saltiness that balances the sweetness—if you want less salt, go for unsalted, but don’t skip the butter altogether.
- Sweetened condensed milk: It’s the sticky glue that holds everything together, giving a luscious, chewy texture. For a dairy-free version, coconut milk condensed into syrup works, but expect a slight coconut note.
- Chocolate chips: I prefer semi-sweet for a balanced richness, but dark chips add an intense, smoky depth. If you want extra gooeyness, toss in a handful of chopped milk chocolate or even white chocolate for variation.
- Vanilla extract: Just a splash enhances all the flavors and keeps the chocolate from feeling flat. If you’re out, a tiny bit of almond extract can add a lovely nutty undertone—use sparingly.
- Oats (optional): Sometimes I toss in a handful for texture—chewy and nutty. Skip if you want pure decadence, but I love how they add a rustic, hearty feel with a subtle crunch.
- Salt: A pinch sparks the chocolate and rounds out the sweetness. If you prefer a more pronounced salt flavor, sprinkle a tiny bit more—just don’t overdo it, or it’ll taste salty instead of balanced.
Spotlight on key ingredients
Unsweetened cocoa powder:
- I love how it adds that deep, rich chocolate flavor and a hint of bitterness. If you prefer a milder taste, try Dutch-processed cocoa, but for that raw, intense cocoa punch, stick with natural unsweetened.
- Chocolate chips: I prefer semi-sweet for a balanced richness, but dark chips add an intense, smoky depth. If you want extra gooeyness, toss in a handful of chopped milk chocolate or even white chocolate for variation.
Butter & Sweetened Condensed Milk:
- Butter: It makes these chews melt-in-your-mouth creamy. Using salted butter adds a subtle saltiness that balances the sweetness—if you want less salt, go for unsalted, but don’t skip the butter altogether.
- Sweetened condensed milk: It’s the sticky glue that holds everything together, giving a luscious, chewy texture. For a dairy-free version, coconut milk condensed into syrup works, but expect a slight coconut note.
Notes for ingredient swaps
- Dairy-Free: Coconut oil can replace butter for a subtle coconut aroma and slightly softer texture.
- Sweetener Swap: Honey or maple syrup can be used instead of condensed milk, but expect a thinner, less sticky result.
- Chocolate Options: Carob chips instead of chocolate chips give a different flavor profile with a slightly earthier taste.
- Nut Butter: A spoonful of peanut or almond butter adds richness; reduce butter slightly to balance moisture.
- Cocoa Powder: Dark cocoa or Dutch-processed cocoa can be swapped, but be aware of flavor and acidity differences.
- Oats: Chopped nuts or shredded coconut can replace oats for crunch and texture variation.
- Salt: Sea salt flakes enhance sweetness and deepen flavor—adjust to taste if you prefer a less salty finish.
Equipment & Tools
- Medium saucepan: To melt butter and mix ingredients gently on low heat.
- Silicone spatula: To stir the mixture smoothly and transfer into the dish.
- Parchment paper: To line the dish for easy removal and clean edges.
- Baking dish (20x20cm or 8x8in): To hold the mixture as it sets in the fridge.
- Sharp knife: To cut into neat squares once firm.
Step-by-step guide to No Bake Chewies
- Gather your equipment: a medium saucepan, silicone spatula, parchment paper, and a baking dish (around 20x20cm or 8x8in).
- In the saucepan, melt 1/2 cup (115g) of unsalted butter over low heat. Stir constantly to prevent burning. Once melted, smell that rich, nutty aroma filling your kitchen.
- Add 1 cup (120g) of unsweetened cocoa powder. Whisk until smooth and glossy. The mixture should turn dark and inviting, with a faint crackle as the cocoa hits the butter.
- Pour in 1 can (14 oz) of sweetened condensed milk. Stir quickly. The mixture will thicken and become sticky, releasing a sweet, milky scent. If it’s too thick, add a teaspoon of milk.
- Stir in 1 teaspoon of vanilla extract and a pinch of salt. Keep mixing until evenly combined. The aroma should deepen, hinting at sweet vanilla and a subtle salty note.
- Add 2 cups (150g) of rolled oats or chocolate chips if using. Mix until just combined. You should see the oats or chips evenly distributed, with a glossy, fudgy appearance.
- Transfer the mixture into the prepared dish. Use the spatula to press it down evenly, smoothing the top. The mixture should feel thick but spreadable, with a rich chocolate smell.
- Chill in the fridge for at least 2 hours. During this time, the mixture firms up, and the flavors meld. You’ll notice the edges start to set, and it becomes more manageable to cut.
- Once chilled, lift out the block using the parchment paper. Use a sharp knife to cut into squares or rectangles. The texture should be firm but chewy, with a shiny, crackly top.
- Serve immediately or store in an airtight container. For softer chews, let them sit at room temperature for 10 minutes before eating. For firmer bites, keep refrigerated.
Chill the chews in the fridge for at least 2 hours until firm. Slice into squares with a sharp knife. Serve immediately or store in an airtight container in the fridge for up to a week.
How to Know It’s Done
- The mixture is glossy and dark, with a rich cocoa aroma before chilling.
- The mixture holds together when pressed in the dish, but isn’t too stiff.
- Edges are firm and slightly crackly after chilling, with a chewy center when cut.
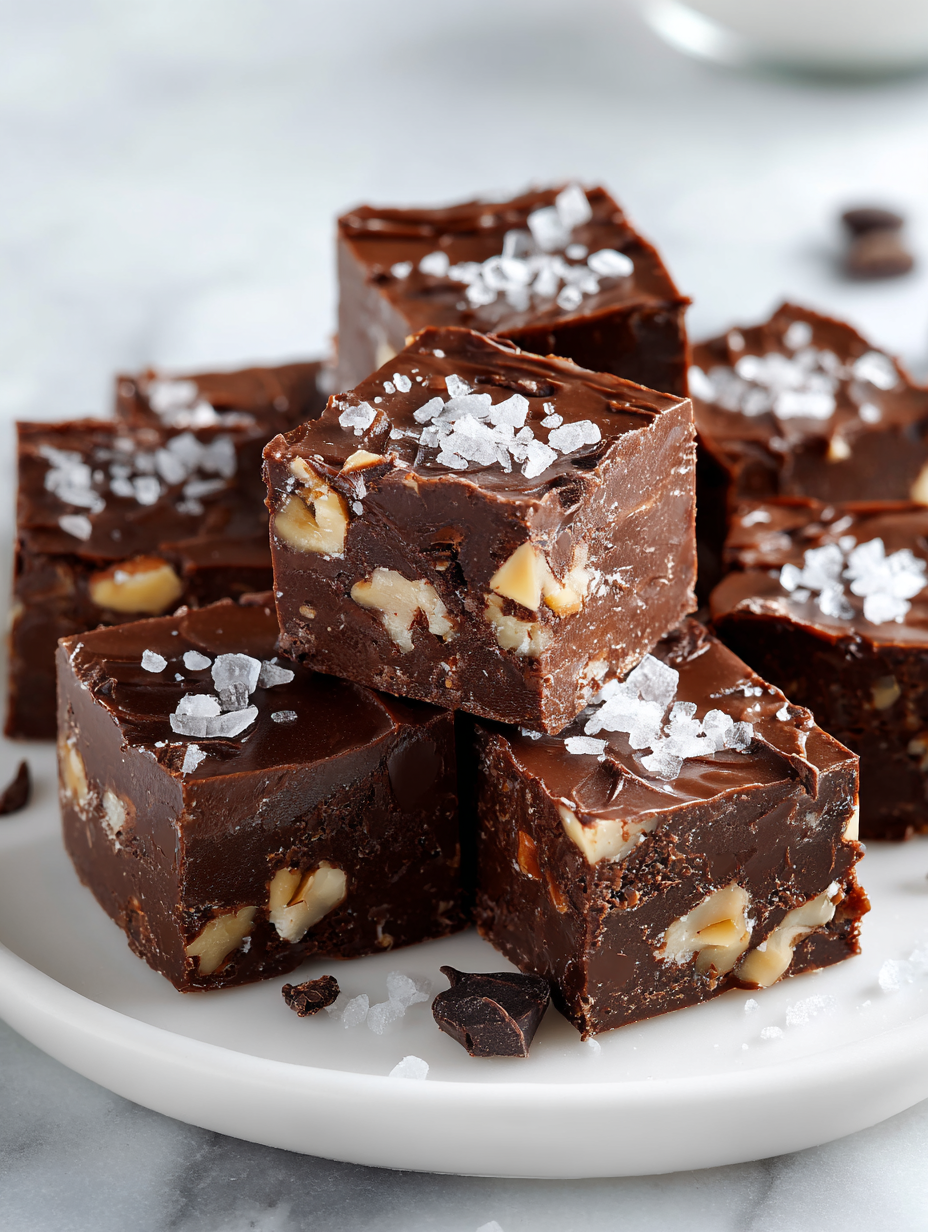
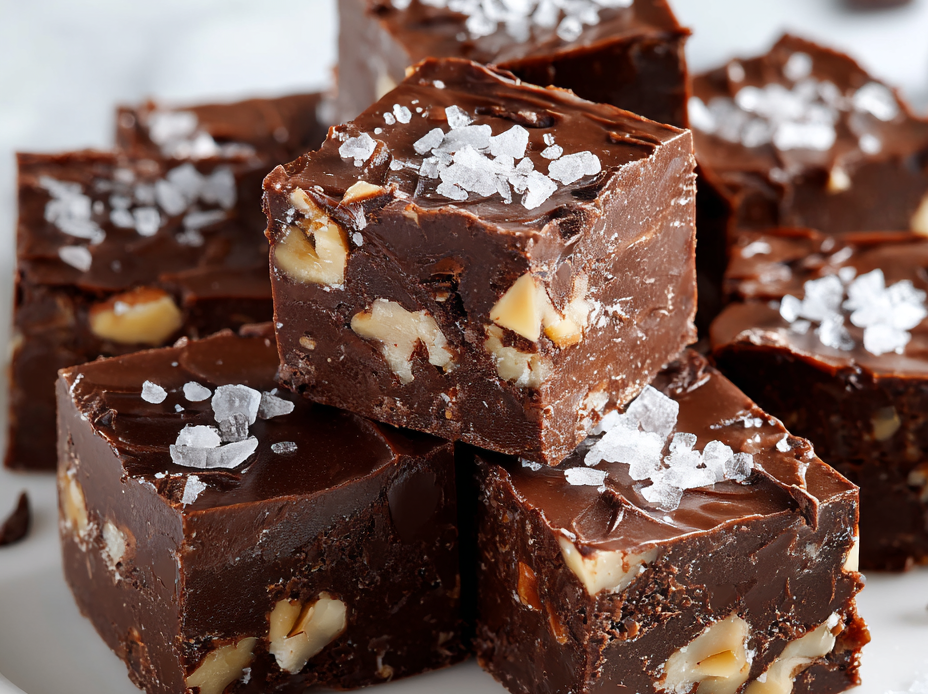
No Bake Chocolate Chewies
Ingredients
Equipment
Method
- Line your baking dish with parchment paper for easy removal later. Melt the butter in a medium saucepan over low heat, stirring gently until it’s completely melted and fragrant.
- Whisk in the unsweetened cocoa powder until the mixture is smooth, glossy, and dark in color, with a gentle crackle as the cocoa hits the butter.
- Pour in the sweetened condensed milk and stir quickly, watching the mixture thicken and become sticky with a sweet, milky aroma filling the air. Keep stirring until fully combined and glossy.
- Add the vanilla extract and a pinch of salt, stirring until evenly incorporated. The mixture should deepen in flavor and smell rich and inviting.
- Fold in the chocolate chips and oats (if using), mixing until they’re evenly distributed throughout the thick, fudgy mixture.
- Transfer the mixture into your prepared dish, using the spatula to press it down firmly and evenly, creating a smooth top surface. The mixture should feel thick and pliable.
- Place the dish in the fridge and chill for at least 2 hours, allowing the mixture to set and firm up with a chewy, fudgy texture.
- Once chilled, lift out the block using the parchment paper and place on a cutting board. Use a sharp knife warmed slightly under hot water to cut into neat squares or rectangles.
- Serve immediately for the best chewy, chocolatey experience, or store in an airtight container in the fridge for up to a week. For longer storage, wrap tightly and freeze for up to 3 months.
Pro tips for perfect No Bake Chewies
- Use high-quality cocoa powder for a richer, more intense chocolate flavor.
- Melt butter slowly over low heat to avoid scorching and develop a nutty aroma.
- Mix ingredients thoroughly to ensure even distribution of chocolate and oats, avoiding streaks.
- Chill the mixture in the fridge until firm, at least 2 hours, for clean cuts and chewy texture.
- Use a sharp knife to cut into neat squares; slightly warm the blade for cleaner edges.
- Press mixture firmly into the pan to prevent gaps and ensure even setting.
- Store in an airtight container and refrigerate to keep chews fresh and chewy.
Common mistakes and how to fix them
- FORGOT to melt butter slowly → Use low heat to prevent burning and separate out burnt bits.
- DUMPED in all ingredients at once → Add ingredients gradually, tasting and adjusting for consistency.
- OVER-TORCHED the mixture → Remove from heat immediately if you see darkening or smell burnt; cool slightly.
- FAILED to chill long enough → Chill at least 2 hours; texture won’t set properly if rushed.
Quick fixes and pantry swaps
- When mixture is too thick, splash in a teaspoon of hot water to loosen it.
- If mixture is crumbly, patch with a little extra condensed milk and stir well.
- Splash a bit of warm milk if chews turn out too firm or dry.
- When mixture sticks to pan, shield with a damp cloth to prevent scorching and easy cleanup.
- Dumped in all ingredients at once? Rescue by gently reheating and stirring to reincorporate.
Prep, store, and reheat tips
- Prepare and press the mixture into the dish a day ahead for extra convenience; it firms up better overnight and saves time later.
- Store the finished chews in an airtight container in the fridge for up to a week; the cold keeps them chewy and fresh.
- For longer storage, freeze the chews wrapped tightly in plastic wrap and kept in a sealed container; they can last up to 3 months.
- Refrigerated chews soften slightly but retain their chewy texture. Let them sit at room temperature for 10 minutes before serving for optimal texture.
- To reheat, briefly microwave a piece for 5-8 seconds until just softens, and enjoy the gooey chocolate aroma again.
Top questions about No Bake Chewies
1. Can I substitute coconut oil for butter?
Yes, you can use coconut oil instead of butter, but it will make the chews slightly softer and add a coconut aroma.
2. Can I make these dairy-free?
Absolutely, dairy-free condensed milk made from coconut milk works well, though it may alter the chewy texture slightly.
3. My chews are too hard to cut, what do I do?
Yes, melting the mixture slightly in the microwave for 10 seconds can make it easier to cut if it’s too firm.
4. How long should I chill the chews?
Chilling for at least 2 hours helps the mixture set properly; if you rush, they may be too soft or crumbly.
5. Can I use different types of chocolate chips?
Using semi-sweet chips balances richness, but dark or white chocolate chips add different flavor profiles.
6. How should I store these chews?
Storing in an airtight container in the fridge keeps them chewy and fresh for up to a week; freeze for longer storage.
7. Should I add salt or not?
Adding a pinch of sea salt enhances the chocolate flavor and balances sweetness, but you can skip it if you prefer less salt.
8. The mixture feels too thick, what can I do?
If mixture is too thick, splash in a teaspoon of hot water or warm milk to loosen it up before pressing into the dish.
9. How do I get neat cuts?
Use a sharp knife warmed slightly under hot water for cleaner cuts and less sticking.
10. Can I add other flavorings?
For an extra flavor boost, try adding a pinch of espresso powder to intensify the chocolate notes.
These no-bake chocolate chewies remind me that sometimes, the simplest ingredients create the most honest treats. They’re perfect for when I need a quick fix that’s rich, sticky, and just a little bit nostalgic.
Sharing these with friends or family makes me realize how small moments—like a chewy, chocolatey bite—tie us back to childhood memories and quiet joys. No matter the chaos outside, in that moment, it’s just chocolate and a little bit of peace.

Hi, I’m Madison Lane, the cook, recipe creator, and heart behind this kitchen. Food has been part of my life for as long as I can remember. Some of my earliest memories are of standing beside my dad while he cooked, watching him move comfortably around the kitchen, tasting sauces, and explaining why patience mattered just as much as seasoning.
