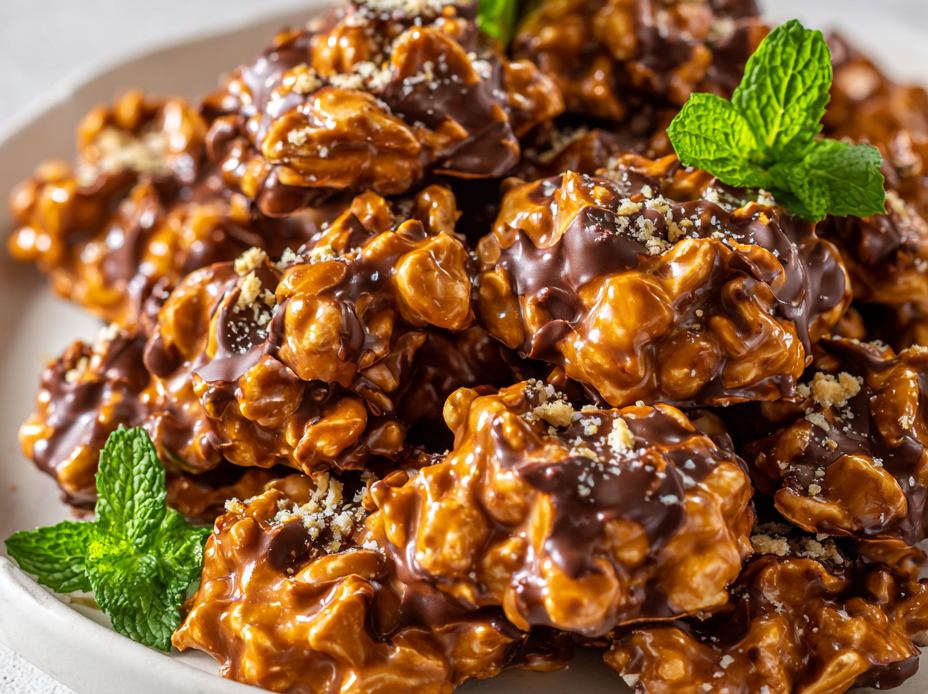
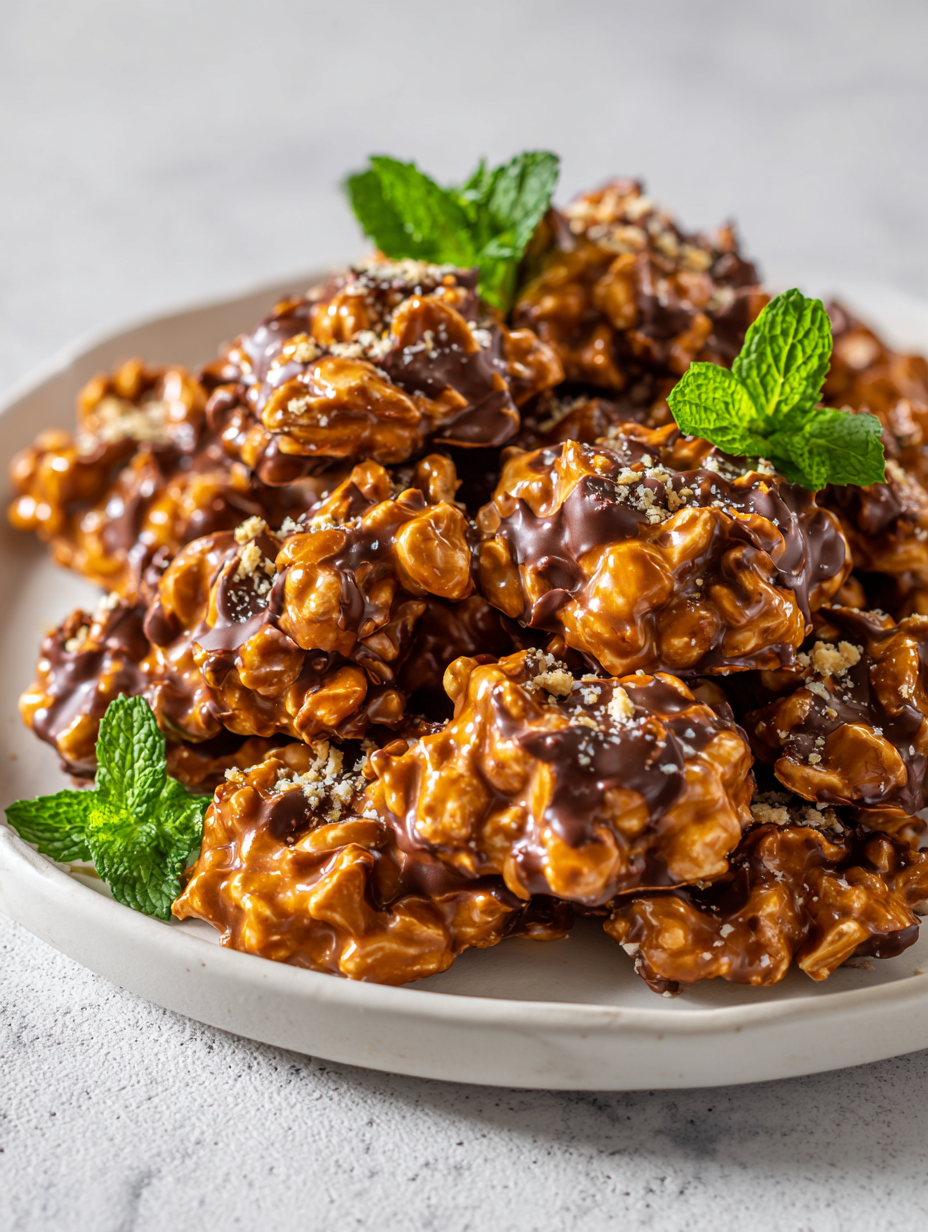
These no-bake peanut clusters are a throwback to childhood afternoons spent rummaging through grandma’s candy jar. There’s something about the way the sweet, salty, and roasted peanut flavors come together without the fuss of baking that makes them feel like a little secret. Perfect for when you want something homemade but don’t want to wait or heat up the kitchen.
Making these is honestly a reminder that some of the best treats are simple, quick, and honest. I love how the sticky melt of chocolate and peanut butter clings to every nut—crunchy, gooey, and just a little messy in the best way. It’s a small batch that’s easy to whip up when the craving hits or when friends unexpectedly drop by.
They’re a bit chaotic to make, but that’s part of the charm. No oven, no cooling racks, just a handful of ingredients and a splash of patience. These clusters are the kind of sweet bite you want to reach for with a cup of coffee or to stash in the freezer for when the mood strikes.
Focusing on the nostalgic comfort of childhood treats, this recipe emphasizes the simplicity and quick satisfaction of homemade peanut clusters without turning on the oven, making it perfect for busy days or spontaneous sweet cravings.
Nostalgic Sweet Simplicity
- These clusters remind me of lazy Sunday afternoons at my grandma’s house, sticky fingers and all.
- There’s a rush of pride when I make these—no oven, just simple ingredients coming together fast.
- I love the chaos of melting chocolate and the smell of roasted peanuts filling the kitchen—so comforting.
- Whenever I pop these in the freezer, I feel like I’ve preserved a tiny bit of childhood mischief.
- Honestly, nothing beats the messy joy of cracking through a crunchy peanut cluster, sweet and salty all at once.
The story behind this recipe
This recipe took shape during a hectic week when I needed a sweet fix but didn’t want to turn on the oven. I remembered how my grandmother used to toss nuts and chocolate together, just enough to make a quick treat before dinner. That instinct to keep it simple, fast, and satisfying stuck with me. Now, whenever I need a little comfort or want to impress friends last minute, these peanut clusters come to mind, with their sticky, crunchy charm and that nostalgic crunch of childhood afternoons.
Historical & Cultural Tidbits
- These peanut clusters have roots in mid-20th-century American home cooking, where quick, no-fuss treats became popular during wartime rationing.
- They’re believed to have originated in the South, where peanuts are a staple crop and candy-making was a community tradition passed down through generations.
- The combination of chocolate and peanuts was famously popularized in the 1920s, thanks to Reese’s Peanut Butter Cups, inspiring countless homemade variations like these clusters.
Key Ingredients Breakdown
- Peanut Butter: I prefer smooth, creamy peanut butter—it’s easier to mix and coats the nuts evenly. Swap for chunky if you like extra crunch and texture contrast.
- Chocolate: I use semi-sweet chocolate chips for that rich, slightly bitter edge, but dark chocolate bars work well, too. Melt slowly to avoid burning that smoky aroma.
- Peanuts: Roasted peanuts are key—they add that nutty, toasty flavor and crunch. You can use salted or unsalted depending on your taste preference.
- Sweetener: I add a touch of honey or maple syrup for a hint of caramelized depth. Skip it if you prefer a less sweet bite, but beware—your clusters might be less sticky.
- Binder: Melted chocolate and peanut butter act as the glue. If you want a firmer cluster, add a little coconut oil to loosen the mixture or chill longer.
- Optional Mix-ins: Dried cranberries, shredded coconut, or even a pinch of sea salt can elevate the flavor. Just fold them in after melting for even distribution.
- Cooking Oil: A tiny splash of coconut or vegetable oil makes melting smoother and adds a subtle sheen. Skip if you want a thicker chocolate coating—just melt gently.
Spotlight on key ingredients
Peanut Butter:
- I prefer smooth, creamy peanut butter—it’s easier to mix and coats the nuts evenly. Swap for chunky if you like extra crunch and texture contrast.
- Chocolate: I use semi-sweet chocolate chips for that rich, slightly bitter edge, but dark chocolate bars work well, too. Melt slowly to avoid burning that smoky aroma.
- Peanuts: Roasted peanuts are key—they add that nutty, toasty flavor and crunch. You can use salted or unsalted depending on your taste preference.
Chocolate & Peanuts:
- Chocolate: Semi-sweet chips melt into a glossy, smooth coating that’s just the right balance of sweet and bitter. Keep the heat gentle to prevent seizing or burning.
- Peanuts: Toasted peanuts develop a deep, aromatic flavor and a satisfying crunch. Freshly roasted peanuts produce the best flavor and aroma during melting.
Notes for ingredient swaps
- Dairy-Free: Use coconut oil or coconut milk instead of butter for a dairy-free version that still melts smoothly.
- Sweetener: Swap honey for agave syrup or coconut nectar—each adds a different kind of sweetness and thickness.
- Chocolate: Dark chocolate or vegan chocolate chips work well if you prefer less sweet or dairy-free options.
- Peanuts: Almonds or cashews can replace peanuts, giving a different nutty flavor and crunch. Toast them lightly first.
- Add-ins: Dried fruit like cranberries or apricots add chewiness, while shredded coconut brings extra texture and aroma.
- Oil: A small splash of neutral oil like grapeseed or canola helps with melting and sheen, but skip if you want a thicker coating.
- Binder: If you want a firmer cluster, try adding a tiny bit of coconut oil or chill longer to set more firmly.
Equipment & Tools
- Medium mixing bowl: To combine and melt chocolate and peanut butter.
- Microwave-safe bowl: For melting chocolate evenly without scorching.
- Spatula: To fold ingredients and scrape the bowl.
- Parchment-lined tray: To hold clusters as they set.
Step-by-step guide to peanut clusters
- Gather your equipment: a medium mixing bowl, a microwave-safe bowl, a spatula, and a parchment-lined tray. The bowl will melt your chocolates, the spatula for mixing, and the tray for setting.
- Chop or measure out 1 cup of roasted peanuts, keeping them ready to mix. If using chunky peanut butter, have about 1/2 cup on hand.
- Place 1 cup semi-sweet chocolate chips and 1/4 cup peanut butter in the microwave-safe bowl. Microwave in 20-second bursts, stirring each time, until fully melted and smooth. (Total time around 1-2 minutes.) Watch for shiny, glossy chocolate.
- Add 1 tablespoon honey or maple syrup into the melted chocolate mixture. Stir well to incorporate, making the mixture sticky and slightly glossy.
- Pour the melted mixture over the peanuts. Use the spatula to fold together until every nut is coated evenly. The mixture should be thick and gooey but manageable.
- Using a spoon or cookie scoop, portion out small clusters onto the prepared parchment tray. Aim for bite-sized mounds—about a tablespoon each.
- Press down gently on each cluster if you want a flatter shape, or leave them rounded for a more rustic look.
- Chill the tray in the fridge for at least 30 minutes. The chocolate will firm up and hold everything together. If in a hurry, freeze for 15 minutes, but keep an eye on the texture.
- Once set, transfer the clusters to an airtight container. Store in the fridge for up to 2 weeks or freeze for longer storage.
- Enjoy these at room temperature for a gooey bite or chilled for a firmer crunch. They’re perfect for quick snack attacks or gifting.
Chill the clusters until firm, about 30 minutes. Serve directly from the fridge or at room temperature for softer bites. Store in an airtight container, layered with parchment, in the fridge or freezer.
How to Know It’s Done
- Chocolate is shiny and fully melted without lumps.
- Clusters hold together firmly when gently pressed.
- Chocolate coating is set and glossy after chilling.
No-Bake Peanut Clusters
Ingredients
Equipment
Method
- Place the chocolate chips and peanut butter in a microwave-safe bowl. Microwave in 20-second bursts, stirring each time until the mixture is smooth, glossy, and fully melted.
- Add the honey or maple syrup to the melted mixture and stir well to combine. This helps make the clusters sticky and easier to form.
- Pour the roasted peanuts into the melted chocolate mixture. Use a spatula to fold everything together until the peanuts are evenly coated with the glossy chocolate mixture.
- Use a spoon or cookie scoop to portion out small mounds onto the parchment-lined tray. Gently press down if you prefer flatter clusters.
- Place the tray in the fridge and chill for at least 30 minutes until the clusters are firm and the chocolate coating is set to a shiny finish.
- Once set, transfer the clusters to an airtight container, layering with parchment paper to prevent sticking. Store in the fridge for up to 2 weeks or freeze for longer storage.
Tips for Perfect Clusters
- Bolded Mini-Head: Use low heat when melting chocolate to keep it smooth and glossy, avoiding seizing or burning.
- Bolded Mini-Head: Chill the mixture briefly before shaping to prevent sticking and ensure clusters hold their form.
- Bolded Mini-Head: Incorporate nuts quickly after melting to keep the chocolate warm enough to coat but not melt excessively.
- Bolded Mini-Head: For an even coating, toss the peanuts in the melted chocolate using a spatula, folding gently until coated.
- Bolded Mini-Head: If clusters are too sticky, refrigerate for 10 minutes to firm up the chocolate before handling further.
- Bolded Mini-Head: When adding optional ingredients, fold in gently after melting to distribute evenly without breaking the chocolate.
- Bolded Mini-Head: Store clusters in an airtight container layered with parchment paper to prevent sticking and preserve crunch.
Common mistakes and how to fix them
- FORGOT to fold in mix-ins → gently incorporate after melting for even distribution.
- DUMPED hot mixture directly into fridge → cool slightly before chilling to prevent condensation.
- OVER-TORCHED chocolate → melt on low power, stir often, and remove at glossy smoothness.
- MISSED to measure ingredients precisely → use standard measuring tools for consistent results.
Quick kitchen fixes
- When mixture is too thick → splash in a tiny bit of hot water to loosen.
- If chocolate isn’t melting smoothly → microwave in short bursts, stirring often.
- Splash melted chocolate on your fingers → chill briefly to firm up before handling.
- Dumped mixture in fridge too early → let it cool slightly for better setting.
- Patch sticky clusters with a quick re-melt and a dash of coconut oil for shine.
Prep, store, and reheat tips
- You can prepare the clusters up to 24 hours in advance; store them in an airtight container in the fridge for best freshness.
- Chill the clusters in the fridge to keep the chocolate firm and intact; they stay good for up to 2 weeks refrigerated.
- Freezing extends their life to about a month; let them thaw slightly at room temperature for a softer bite.
- Refrigerate or freeze to maintain crunch; bring to room temp if you prefer a softer, gooey texture before eating.
Top questions about peanut clusters
1. Can I use natural peanut butter?
Yes, you can use natural peanut butter, but it might be a bit runnier and less sticky, so adjust the amount if needed.
2. How long should I chill the clusters?
Chilling in the fridge for at least 30 minutes helps the clusters set firm, but freezing for 15 minutes speeds it up.
3. My chocolate is seizing, what do I do?
If the chocolate isn’t melting smoothly, microwave in short bursts and stir often to prevent burning.
4. Can I swap out peanuts for other nuts?
Use any roasted nuts you like—almonds, cashews, or mixed nuts work well and add different textures.
5. How should I store the clusters?
Store in an airtight container in the fridge for up to 2 weeks or freeze for longer storage.
6. My clusters are too sticky, how do I fix it?
If your clusters are too sticky, pop them in the fridge for 10-15 minutes to firm up before handling.
7. Can I add salt or other flavors?
Add a pinch of sea salt or sprinkle on top after setting to enhance flavor and balance sweetness.
8. Can I add mix-ins?
Yes, adding dried fruit or shredded coconut can give extra texture and flavor, fold in after melting.
9. Can I use different types of chocolate?
Use semi-sweet or dark chocolate for richer flavor—white chocolate can work too but will change the taste.
10. Can I customize the recipe?
Yes, these clusters are forgiving; tweak ingredients to suit your taste or dietary needs easily.
These peanut clusters are a little messy, a little sweet, and a lot of nostalgic charm. They remind me that sometimes the simplest treats are the most satisfying, especially when they come together in a quick moment of kitchen chaos.
Whenever I make a batch, I think about how a handful of ingredients can turn into something that feels special—no oven required. It’s the kind of sweet fix that’s perfect for sneaking into busy days or sharing with friends who appreciate homemade comfort.

Hi, I’m Madison Lane, the cook, recipe creator, and heart behind this kitchen. Food has been part of my life for as long as I can remember. Some of my earliest memories are of standing beside my dad while he cooked, watching him move comfortably around the kitchen, tasting sauces, and explaining why patience mattered just as much as seasoning.
