This no-bake chocolate slice is my go-to for those days when the oven feels like a chore. It’s a quick fix that satisfies my sweet tooth without the usual fuss, and honestly, it’s become a bit of a ritual on busy weekends. The smell of melting chocolate and toasted biscuits always pulls me out of whatever chaos I’m in.
There’s something deeply satisfying about pressing this simple mixture into a tray and watching it set—like a small act of rebellion against the oven’s heat. It’s a recipe I’ve tweaked over the years, adding a pinch of sea salt or a dash of vanilla just to keep it interesting. No matter how often I make it, it still feels like a little secret treat I can whip up in moments.
This recipe is my secret weapon for those days when I need a quick, satisfying treat that doesn’t involve turning on the oven. It’s about the joy of making something delicious with minimal fuss, perfect for when time’s tight or the weather’s too hot for baking. Plus, it’s a nostalgic nod to childhood snacks, but with a grown-up twist.
The story behind this recipe
- This recipe came together one rainy afternoon when I needed a sweet fix but didn’t want to turn on the oven. I remembered my grandmother’s quick chocolate bars, which she’d make with whatever was in the pantry. That simple memory sparked the idea to create a no-bake version that’s easy to whip up and reliably delicious.
- Over the years, I’ve added my own tweaks—more butter, a sprinkle of sea salt, a dash of vanilla—to make it feel more indulgent. It’s become my fallback for unexpected guests or when I just need something sweet and satisfying, fast. There’s a real comfort in knowing I can make this in minutes, with ingredients I always keep on hand.
- heading: The story behind this recipe
Ingredient breakdown: key components
- Dark chocolate: I love the intense, slightly bitter flavor that melts smoothly, coating every bite. If you prefer milder sweetness, try milk chocolate instead.
- Butter: It gives the slice that rich, velvety texture. You can swap in coconut oil for a dairy-free version, but it’ll have a slightly different melt and richness.
- Biscuits: I use plain digestives—they add crunch and a buttery note. Graham crackers work well too, especially if you like a hint of sweetness.
- Sweetener: I usually stick to golden syrup or honey for a sticky, glossy finish. Maple syrup can be a good swap if you want a subtle, smoky sweetness.
- Vanilla extract: Just a splash brightens everything up. If you don’t have vanilla, a pinch of cinnamon or a dash of coffee can add depth.
- Sea salt: A tiny pinch enhances all the flavors and balances the sweetness. If you don’t have sea salt, regular table salt works, just don’t overdo it.
- Optional toppings: Chopped nuts or dried fruit can add texture and contrast. I love a handful of toasted almonds for a nutty punch.
Spotlight on key ingredients
Dark chocolate:
- I love the intense, slightly bitter flavor that melts smoothly, coating every bite. If you prefer milder sweetness, try milk chocolate instead.
- Butter: It gives the slice that rich, velvety texture. You can swap in coconut oil for a dairy-free version, but it’ll have a slightly different melt and richness.
Biscuits:
- I use plain digestives—they add crunch and a buttery note. Graham crackers work well too, especially if you like a hint of sweetness.
- Sea salt: A tiny pinch enhances all the flavors and balances the sweetness. If you don’t have sea salt, regular table salt works, just don’t overdo it.
Notes for ingredient swaps
- Dairy-Free: Swap butter for coconut oil or margarine. It may add a slightly different melt and coconut aroma.
- Chocolate: Use dairy-free dark chocolate or cacao nibs for a richer, more intense cocoa flavor. Adjust sweetness if needed.
- Biscuits: Gluten-free digestives or graham crackers work well. For a nutty crunch, try crushed nuts pressed into the base.
- Sweetener: Honey or maple syrup can replace golden syrup, but expect a slightly different texture and flavor profile.
- Vanilla: Almond extract or vanilla bean paste can add a different aromatic note if you don’t have vanilla extract.
- Salt: Sea salt flakes add a subtle crunch and flavor boost. Regular table salt is fine if used sparingly.
- Toppings: Chopped nuts, dried fruit, or coconut flakes can be added on top for extra texture and contrast.
Equipment & Tools
- 20x20cm (8×8 inch) baking tray: Holds the slice as it sets and cools.
- Saucepan: Melts the chocolate and butter evenly.
- Mixing spoon: Stirs the melted ingredients and combines the biscuits.
- Parchment paper: Prevents sticking and makes removal easy.
- Sharp knife: Cuts clean slices after setting.
Step-by-step guide to no bake chocolate slice
- Gather your equipment: a 20x20cm (8×8 inch) baking tray, a saucepan, a mixing spoon, and parchment paper. Line the tray with parchment for easy removal.
- Melt the butter and chocolate: place them in the saucepan over very low heat (around 50°C / 122°F). Stir gently until smooth and shiny. This should take about 3-5 minutes. Keep an eye to avoid scorching or burning; if the mixture smells smoky or starts to crackle, remove from heat immediately.
- Prepare the biscuit base: roughly crush the biscuits into small, irregular pieces. You can do this by hand or in a sealed bag with a rolling pin. Aim for a mix of fine crumbs and some larger bits for texture.
- Combine ingredients: pour the crushed biscuits into the melted chocolate and butter mixture. Add the vanilla extract and a pinch of sea salt. Mix thoroughly until all the biscuit pieces are coated and the mixture is cohesive. It should be sticky and glossy.
- Transfer to tray: spoon the mixture into the prepared tray. Use the back of a spoon or a spatula to press it down evenly, creating a smooth top. Press firmly but gently—don’t crush the biscuits too flat, or you’ll lose the crunch.
- Set in the fridge: cover loosely with plastic wrap or foil. Chill for at least 2 hours, or until firm and set. For a quicker set, you can place it in the freezer for about 1 hour, but keep an eye on it to prevent freezer burn.
- Slice and serve: once set, lift the slice out of the tray using the parchment paper. Use a sharp knife to cut into squares or rectangles. For clean cuts, wipe the blade between slices. Serve directly or store in an airtight container.
Cover the tray loosely with plastic wrap or foil and refrigerate for at least 2 hours until firm. Slice into squares, then serve directly from the fridge or at room temperature for a softer bite.
How to Know It’s Done
- Chocolate mixture is shiny and smooth without lumps.
- The biscuit base looks evenly pressed and firm to the touch.
- The slice is set and firm after chilling, with clean edges when cut.
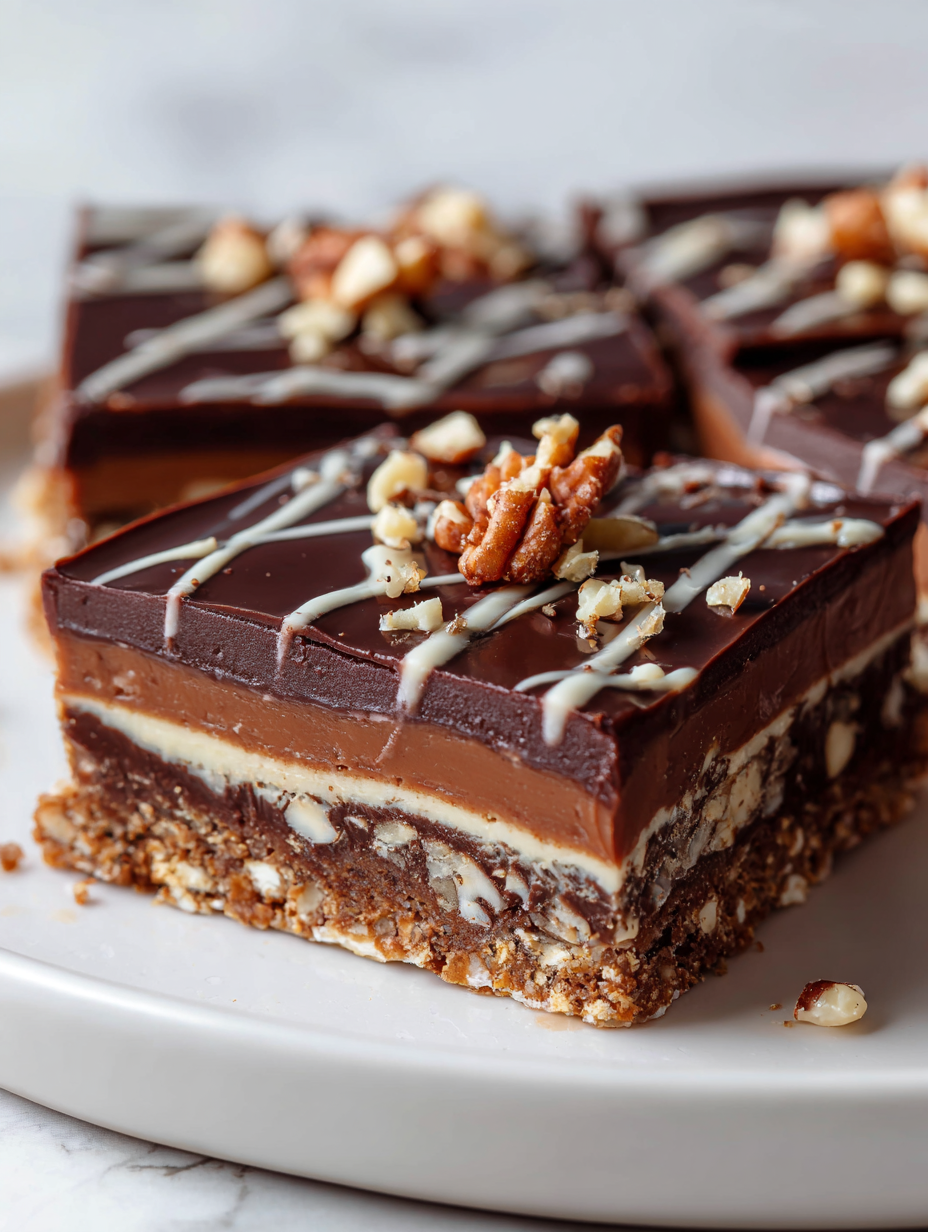
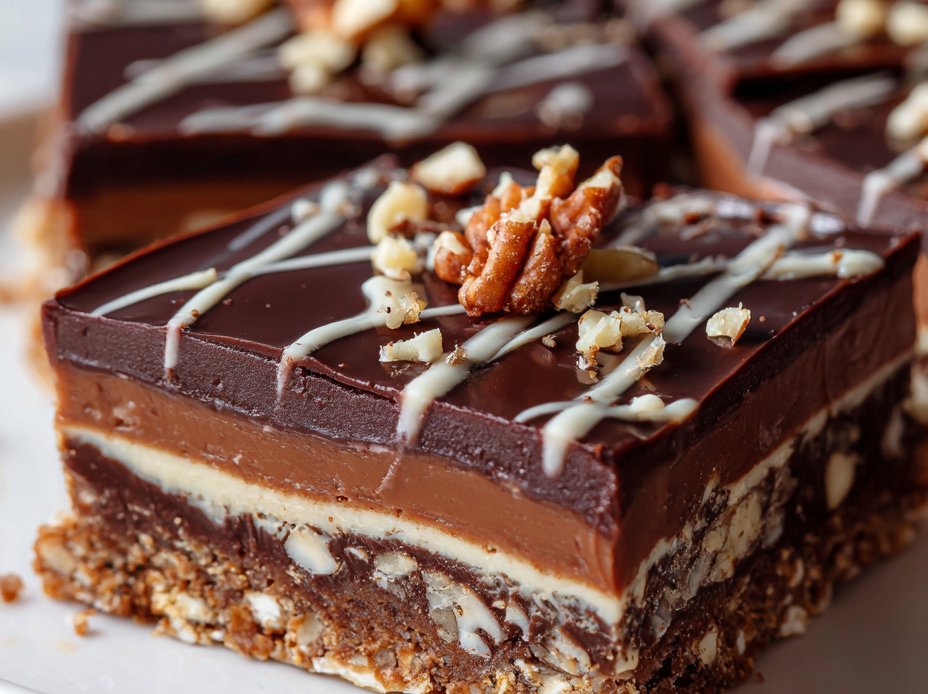
No-Bake Chocolate Slice
Ingredients
Equipment
Method
- Line your baking tray with parchment paper to prevent sticking and set it aside.
- Break the digestive biscuits into small chunks and crush some into finer crumbs—aim for a mixture of textures for crunch and cohesiveness.
- Place the dark chocolate and butter in a saucepan over very low heat. Gently melt while stirring continuously until the mixture is smooth, shiny, and fully combined, filling the air with a rich chocolate aroma.
- Remove the saucepan from heat and stir in the vanilla extract and a pinch of sea salt, blending well for extra flavor depth.
- Pour the crushed biscuits into the melted chocolate mixture. Fold everything together with a spoon until all biscuit pieces are coated and the mixture looks thick and glossy.
- Transfer the mixture into your prepared tray. Use the back of a spoon or a spatula to press it down firmly and evenly, creating a smooth, compact surface.
- Refrigerate the tray for at least 2 hours or until the slice is firm and set. For quicker results, pop it in the freezer for about 1 hour, but keep an eye on it to prevent over-freezing.
- Once set, lift the slice out of the tray using the parchment paper. Use a sharp knife to cut into squares or rectangles, wiping the blade between cuts for clean edges.
- Serve immediately or store in an airtight container in the fridge for up to 3 days. For longer storage, wrap tightly and freeze for up to 2 months; thaw in the fridge before serving.
Notes
Tips for perfect no-bake slices
- Bolded mini-head: Use high-quality chocolate for a glossy, rich finish that melts smoothly and enhances flavor.
- Bolded mini-head: Chill the mixture briefly before pressing to prevent sticking and make spreading easier.
- Bolded mini-head: Press the mixture firmly into the tray to ensure even setting and clean slices.
- Bolded mini-head: Wipe the knife between cuts for smooth, clean edges and avoid crumbling.
- Bolded mini-head: If the mixture is too thick to spread, warm it slightly over low heat for better consistency.
- Bolded mini-head: Incorporate a pinch of sea salt to balance sweetness and heighten chocolate flavor.
- Bolded mini-head: For a shinier appearance, briefly warm the pressed slice in the fridge before slicing.
Common mistakes and how to fix them
- FORGOT to cool before slicing → Slice while slightly warm for cleaner cuts.
- DUMPED extra chocolate → Keep heat low to prevent burning and achieve smooth melting.
- OVER-TORCHED chocolate → Remove from heat as soon as it melts to avoid bitterness.
- MISSED chilling time → Ensure at least 2 hours in fridge for proper set and texture.
Quick fixes and pantry swaps
- When mixture is too thick → Splash in a little warm milk or cream to loosen.
- If chocolate isn’t melting smoothly → DUMPED in the heat, then stir constantly over low heat.
- Over-chilled slice → PATCH by letting it sit at room temperature for 10 minutes before slicing.
- When slices crack or crumble → SHIELD with a warm knife, wiped clean between cuts.
- heading
Prep, store, and reheat tips
- Prepare the mixture and press into the tray a day ahead for more flavor meld and easier slicing.
- Store the slice uncovered in the fridge for up to 3 days; cover loosely to prevent drying out.
- For longer storage, wrap tightly in plastic wrap and freeze for up to 2 months; thaw in fridge before serving.
- Reheat slightly in the fridge for 10-15 minutes before serving to soften, or serve chilled for firm slices.
- The flavors deepen overnight, making it an even richer chocolate hit the next day.
Top questions about no bake chocolate slice
1. How important is the quality of chocolate?
Use a good quality dark chocolate for a glossy, rich finish that melts smoothly. It makes a noticeable difference in flavor and texture.
2. Can I make this dairy-free?
Yes, you can swap butter for coconut oil or margarine. The slice will still set well, but might have a slightly different melt and richness.
3. How do I prepare the biscuits?
Crush the biscuits into irregular pieces for texture. Larger chunks give more crunch, while finer crumbs make it more cohesive.
4. How long should I chill the slice?
Chill the mixture for at least 2 hours until firm. If you’re in a rush, a quick 1-hour freeze works but check it frequently to prevent freezer burn.
5. How do I get clean cuts?
Use a sharp knife wiped between cuts for clean slices. For smoother edges, briefly warm the knife with hot water before slicing.
6. What sweetener can I use instead of golden syrup?
You can substitute honey or maple syrup for golden syrup. Expect a different flavor—maple adds a smoky note, honey is sweeter and floral.
7. Why add salt to the recipe?
Add a pinch of sea salt to enhance the chocolate flavor and balance sweetness. Regular table salt works if used sparingly.
8. What if my chocolate seizes or doesn’t melt properly?
If the chocolate isn’t melting smoothly, lower the heat and stir constantly. If it seizes, add a splash of warm milk to loosen it.
9. How should I store leftovers?
Store the slice in an airtight container in the fridge for up to 3 days. For longer, freeze wrapped in plastic for up to 2 months.
10. What if the mixture is too thick to spread?
When the mixture feels too thick, warm it gently over low heat or add a small splash of warm milk to loosen it.
Making this no-bake chocolate slice is like capturing a moment of simple joy. It’s a treat that comes together quickly, yet feels indulgent and satisfying, especially when shared with friends or family. Sometimes, the best desserts are the ones you can whip up with ingredients already in your pantry, no fuss required.
It’s a little reminder that comfort and happiness can be found in the small, honest acts of cooking—like pressing a mixture into a tray and watching it set. In these busy times, having a reliable, homemade sweet on hand is a quiet pleasure worth savoring.

Hi, I’m Madison Lane, the cook, recipe creator, and heart behind this kitchen. Food has been part of my life for as long as I can remember. Some of my earliest memories are of standing beside my dad while he cooked, watching him move comfortably around the kitchen, tasting sauces, and explaining why patience mattered just as much as seasoning.
