These no bake caramel bars are my shortcut to feeling like a kid again, without the hassle of turning on the oven. The smell of sweet caramel melting into buttery graham cracker crust smells like Sunday afternoons in my grandma’s kitchen—simple, warm, and a little chaotic in the best way. They come together fast, which means I get to indulge sooner and with less mess, perfect for those busy weeknights when dessert feels like a luxury I can’t quite justify.
What I love most is how forgiving this recipe is—no precise baking times, no thermometer needed, just a little patience while the caramel sets and the flavors meld. It’s a treat that’s equal parts nostalgic and practical, perfect for sharing with friends or just hanging onto that childhood feeling of sticky fingers and sweet satisfaction. Honestly, the best part is how easy it is to customize—add a sprinkle of sea salt or a dash of vanilla for an extra punch, no fuss required.
Focusing on the nostalgic joy of a childhood treat, but with a modern, simplified twist that skips the oven and keeps it accessible for busy weeknights.
Origin of these caramel bars
- This recipe was born out of late-night cravings and a cluttered pantry. I wanted something sweet, quick, and no-fuss, but still rich and satisfying. One evening, I just threw together what I had—graham crackers, butter, caramel—and hoped for the best. The result was a sticky, decadent bar that I couldn’t stop eating.
- It’s become my go-to when friends drop by unexpectedly or when I need a little comfort after a long day. I love how flexible it is—no oven, no complicated steps, just simple ingredients that come together in a way that feels almost like a little victory in the kitchen. Plus, the smell of melting caramel and toasted crust filling the house is pure magic, even if it’s accidental.
- heading
- story_type
Ingredient breakdown: key components
- Graham crackers: I love how their honey-sweet, slightly toasty flavor forms the crunchy, buttery crust. You can swap in digestive biscuits if you want a milder taste, but don’t skip the crunch.
- Unsalted butter: It’s essential for that rich, melt-in-your-mouth base. Use salted if that’s all you have, just cut back slightly on the salt in the crust to balance flavors.
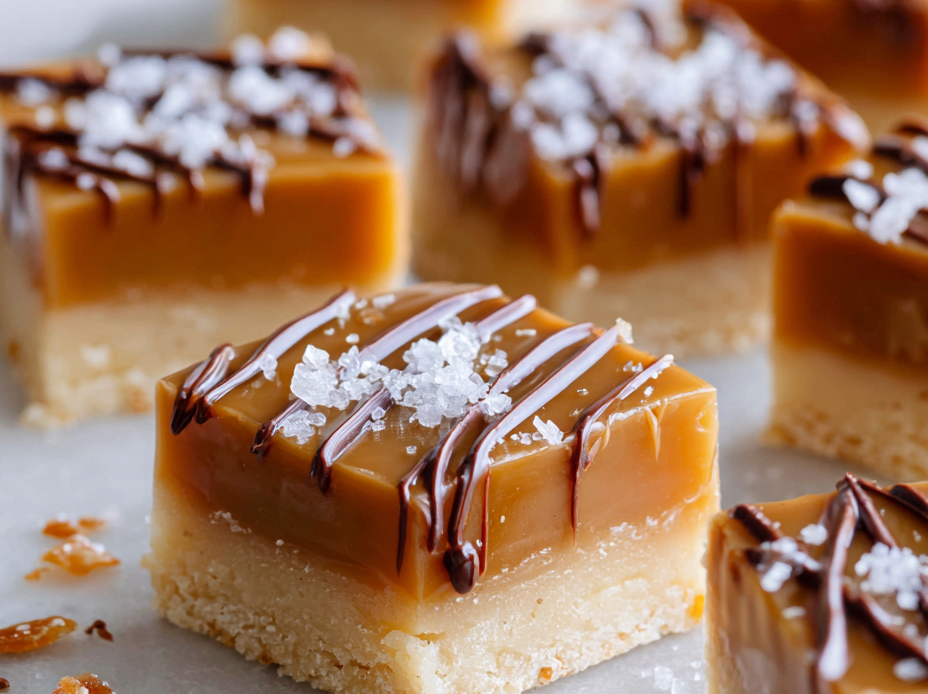
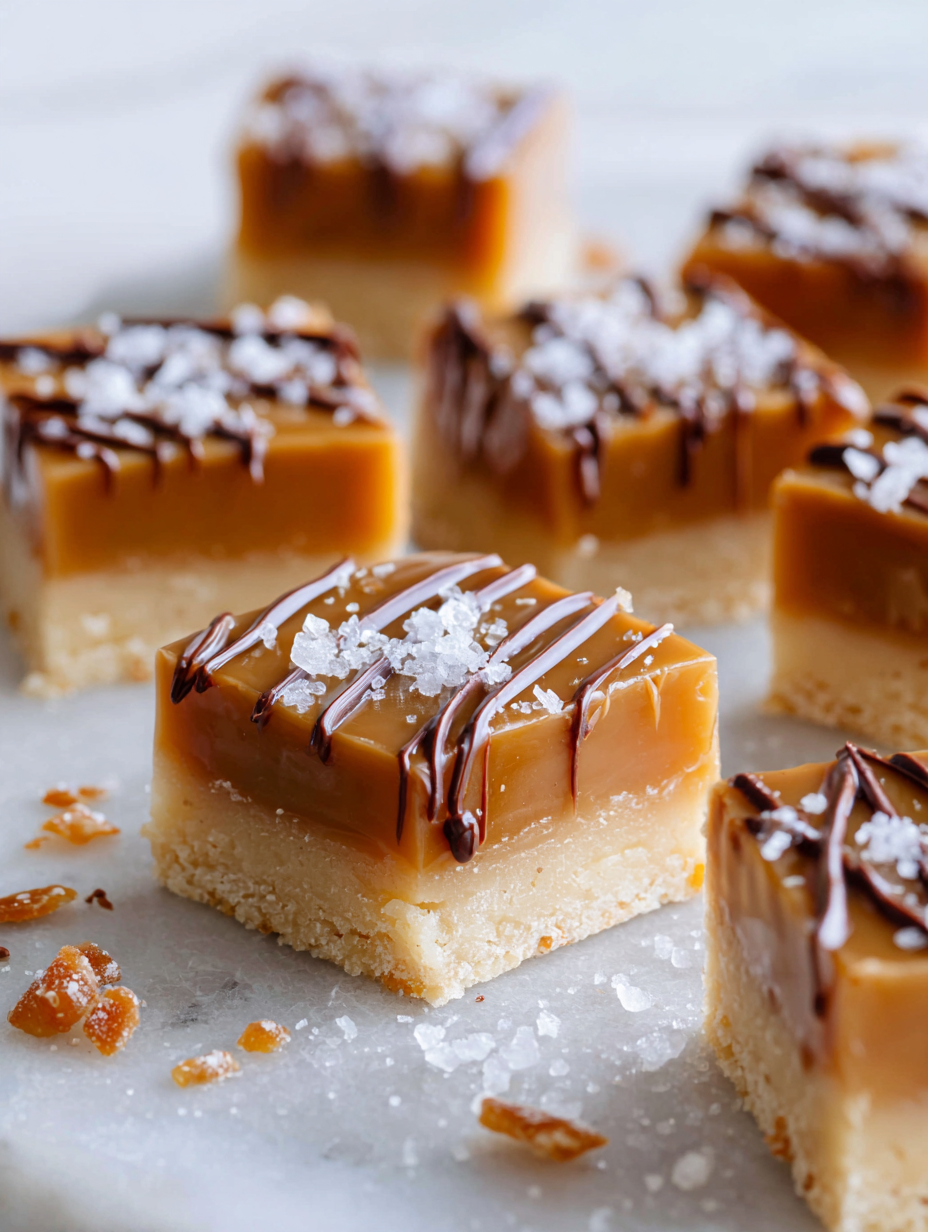
- Caramel sauce: Oozy, golden, and smoky—this is the star. For a deeper flavor, try a touch of sea salt or bourbon in the caramel, but skip if you prefer a straightforward sweetness.
- Sweetened condensed milk: Thick, sweet, and creamy—this binds everything together. Light or reduced-fat versions work, but the full-fat gives the richest texture and flavor.
- Sea salt flakes: A pinch on top adds a spark of contrast. You can substitute with flaky sea salt or even a dusting of coarse salt for a more dramatic crunch and burst of flavor.
- Chocolate (optional): Melty, bittersweet, or milk—whatever melts your mood. If you skip it, the bars still shine, but a drizzle adds a lovely glossy finish and depth.
- Vanilla extract: Just a splash boosts sweetness and rounds out flavors. If you don’t have vanilla, a tiny bit of almond extract can add a lovely aroma and complexity.
Spotlight on key ingredients
Graham crackers:
- Their honey-sweet, slightly toasty flavor creates a crunchy, buttery crust that’s a little nostalgic. You can swap in digestive biscuits if you like, but don’t skip the crunch.
- Sweetened condensed milk: Thick, sweet, and creamy—this is what binds everything together. It melts into the caramel and adds richness. Light versions are fine, but full-fat gives the best texture.
Butter:
- Caramel sauce: Oozy, golden, with a smoky depth—this is the star. For a richer flavor, add a pinch of sea salt or bourbon, but keep it simple if you just want sweetness.
- Melts into a luscious, melt-in-your-mouth base. Use unsalted for control, or salted if you want a hint of extra flavor—just cut back on salt in the crust.
Notes for ingredient swaps
- Dairy-Free: Use coconut oil or vegan butter instead of butter. It may alter the richness slightly but keeps it plant-based.
- Gluten-Free: Swap graham crackers for gluten-free cookies or crushed rice cereal for a lighter, crisp base.
- Sugar-Free: Replace condensed milk with a homemade caramel made from sugar substitutes and coconut milk for a less sweet, more subtle flavor.
- Vegan: Use plant-based caramel sauces and vegan graham crackers. Expect a slightly different texture but same sweetness.
- Salted Caramel: Add a pinch of sea salt in the caramel or sprinkle more on top to enhance depth and contrast.
- Chocolate Variations: Swap milk chocolate for dark or white chocolate for different flavor profiles and sweetness levels.
- Nutty Twist: Mix in chopped toasted nuts like pecans or almonds into the crust for extra crunch and flavor.
Equipment & Tools
- 20cm (8-inch) square pan: To hold and shape the bars
- Spatula: For spreading and smoothing layers
- Small saucepan: To melt butter and cook caramel
- Parchment paper: To prevent sticking and for easy removal
Step-by-step guide to no bake caramel bars
- Gather your equipment: a 20cm (8-inch) square pan, a spatula, a small saucepan, and a parchment paper-lined tray. The pan is for melting and mixing, the spatula for spreading, and the saucepan for caramel work.
- Line the pan with parchment, allowing some overhang for easy removal. This keeps cleanup simple and the bars intact.
- In the saucepan, melt 125g (1/2 cup) unsalted butter over low heat. Stir gently until fully melted and fragrant, about 2 minutes. Watch for a slight shimmer—don’t let it brown.
- Crush 200g (about 1 1/2 cups) graham crackers into fine crumbs. You can pulse them in a food processor or crush in a zip-top bag with a rolling pin. Mix crumbs with 50g (1/4 cup) melted butter in a bowl until evenly coated.
- Press the crumb mixture firmly into the prepared pan with the back of a spatula or your fingers. Aim for an even layer, about 1.5cm (half-inch) thick. Chill in the fridge for 10 minutes to set the crust while you prepare the caramel.
- In the same saucepan, pour in 1 can (397g) sweetened condensed milk and 120ml (1/2 cup) caramel sauce. Heat over low, stirring constantly. Bring to a gentle simmer, about 3-4 minutes, until it thickens slightly and turns a rich, golden hue.
- Once thickened, pour the caramel over the chilled crust. Use the spatula to spread it evenly. Work quickly before it cools and becomes difficult to manipulate.
- Optional: sprinkle a pinch of flaky sea salt on top for contrast. Let the bars sit at room temperature for 5 minutes, then transfer to the fridge to set fully for at least 2 hours or overnight.
- Check the bars: the caramel should be firm but still slightly sticky, the crust crisp, and the edges smooth. The caramel jiggles just a little when gently shaken.
- To serve, lift the bars out of the pan using the parchment overhang. Slice into squares with a sharp knife, wiping the blade between cuts for clean edges. Enjoy the oozy caramel in every bite.
Chill the assembled bars for at least 2 hours or overnight to ensure firm caramel and crust. Slice into squares and serve directly from the fridge for best texture and flavor. Let sit at room temperature for 10 minutes before serving if you prefer softer caramel.
How to Know It’s Done
- Caramel is firm but still slightly sticky when pressed lightly.
- Crust is set and holds together when pressed.
- Bars have a smooth, glossy caramel surface with no visible cracks or gaps.
No-Bake Caramel Bars
Ingredients
Equipment
Method
- Line your square pan with parchment paper, allowing a slight overhang for easy removal.
- Crush the graham crackers into fine crumbs using a food processor or by placing them in a zip-top bag and pounding with a rolling pin.
- In a small saucepan, melt the butter over low heat until it’s just shimmering and fragrant, about 2 minutes.
- Combine the crushed graham crackers with the melted butter in a bowl, mixing until evenly coated and crumbly.
- Press the crumb mixture firmly into the prepared pan, creating an even crust about half an inch thick. Use the back of a spatula or your fingers to smooth the surface.
- Chill the crust in the fridge for 10 minutes while you prepare the caramel layer.
- In the same saucepan, pour in the sweetened condensed milk and caramel sauce, then stir over low heat. Cook gently, stirring constantly, until the mixture thickens slightly and turns a rich golden color, about 3-4 minutes.
- Pour the warm caramel mixture over the chilled crust, spreading evenly with a spatula. If desired, sprinkle a pinch of sea salt flakes on top for contrast.
- Let the bars sit at room temperature for 5 minutes, then transfer to the fridge to set for at least 2 hours or overnight for best results.
- Once set, lift the bars out of the pan using the parchment overhang. Use a sharp knife to cut into squares, wiping the blade between cuts for clean edges.
- If desired, melt some chocolate and drizzle over the bars for an extra indulgent finish. Serve and enjoy these sticky, sweet, and satisfying no-bake caramel bars!
Tips for perfect caramel bars
- Bolded Mini-Head: Use room temperature ingredients → Ensures smooth, even melting and mixing.
- Bolded Mini-Head: Crush crackers finely → Creates a dense, uniform crust with no large pieces remaining.
- Bolded Mini-Head: Stir caramel constantly → Prevents burning and keeps consistency silky and smooth.
- Bolded Mini-Head: Chill before slicing → Firm caramel and crust for clean, tidy squares.
- Bolded Mini-Head: Work quickly with caramel → It thickens fast, so have everything ready for pouring and spreading.
- Bolded Mini-Head: Add sea salt flakes → Enhances caramel depth and provides a satisfying crunch on top.
- Bolded Mini-Head: Use sharp knife for slicing → Cuts clean through the firm caramel without tearing.
Common mistakes and how to fix them
- FORGOT to grease pan → Use parchment for easy removal and clean-up.
- DUMPED caramel too hot → Let it cool slightly for a smoother pour.
- OVER-TORCHED caramel → Lower heat immediately to prevent bitterness.
- MISSED stirring in caramel → Stir constantly to avoid burning and uneven texture.
Fast fixes for caramel bars
- When caramel is too thick → Splash in a little warm cream to loosen consistency.
- If caramel crackles and shimmers → Patch with a gentle stir and lower heat immediately.
- Splash cold water on caramel that’s over-torched → It’ll stop cooking and cool quickly.
- Dumped in too much salt → Rinse the surface quickly and add a bit more caramel for balance.
- When bars don’t set → Shield with foil and refrigerate for an extra hour to firm up.
Prep, store, and reheat tips
- Prepare the crust and crush the crackers ahead of time; store in an airtight container for up to 2 days. The smell of toasted honey keeps it inviting.
- Make the caramel sauce and keep refrigerated in a sealed jar for up to 1 week. Warm slightly to loosen before pouring for a smooth finish.
- Assemble and chill the bars in the fridge for at least 2 hours, or overnight, until the caramel is firm and slices cleanly. The cool touch keeps the caramel glossy and chewy.
- Refrigerate leftovers in an airtight container for up to 5 days. Expect the caramel to stay sticky and sweet, with flavors mellowing slightly over time.
- To reheat, warm slices briefly in the microwave in 10-second bursts, until the caramel just softens and releases a warm, inviting aroma. Avoid overheating to prevent melting.
Top questions about caramel bars
1. How do I cut the bars neatly?
Use a sharp knife and wipe between cuts for clean squares. Let the bars sit at room temp for softer caramel or chill for a firmer bite.
2. Why won’t my caramel set?
If caramel isn’t setting, make sure it’s cooled enough before refrigerating. Chill for at least 2 hours or overnight for best results.
3. How do I avoid burning the caramel?
To prevent burning, stir constantly and keep heat low. If caramel starts to crackle or shimmer, lower the heat immediately.
4. Can I use different crackers or cookies?
Yes, you can swap graham crackers for digestive biscuits or gluten-free cookies, but the texture and flavor might shift slightly.
5. How long can I keep these bars?
Refrigerate leftovers in an airtight container for up to 5 days. To reheat, microwave in 10-second bursts until slightly warm and gooey.
6. Can I add more salt on top?
Add a pinch of sea salt on top before chilling. It creates a lovely contrast and enhances the caramel flavor with a burst of saltiness.
7. Are there vegan options for butter?
Use coconut oil or vegan butter as substitutes for butter. They mimic the richness but may alter the flavor slightly.
8. What if my caramel is too thick?
If caramel is too thick to pour, warm it gently or splash in a little warm cream to loosen it.
9. How do I fix burnt caramel?
When caramel over-torches or burns, lower the heat immediately. Rinse the pan quickly with cold water to stop the cooking.
10. Should I serve the bars cold or at room temp?
For a softer, chewier texture, serve at room temperature. For a firmer, crunchier bar, chill in the fridge before slicing.
These bars remind me that sometimes, the simplest ingredients create the most nostalgic moments. There’s a quiet satisfaction in their gooey, buttery richness that feels like a small victory in my busy days.
Sharing these with friends or family feels like passing on a little piece of childhood, wrapped in a caramel glow. They’re imperfect, yes, but always warmly welcomed and quickly gone, leaving behind only smiles and a few sticky fingers.

Hi, I’m Madison Lane, the cook, recipe creator, and heart behind this kitchen. Food has been part of my life for as long as I can remember. Some of my earliest memories are of standing beside my dad while he cooked, watching him move comfortably around the kitchen, tasting sauces, and explaining why patience mattered just as much as seasoning.
