Sometimes, dessert needs to be simple, quick, and still feel special. These no bake cheesecake cups hit that sweet spot without fuss or waiting. They’re perfect for when a craving strikes but you don’t want to mess around with a water bath or crust mess.
What I love most is how adaptable they are—use whatever berries or toppings you have on hand. Plus, they’re easy to make in advance, so you get to enjoy that creamy, tangy bite without rushing. It’s a small, satisfying moment that doesn’t demand much effort but feels like a treat.
This recipe is about transforming a classic indulgence into a portable, no-fuss treat that fits into busy mornings or quick gatherings. The idea of individual cheesecake cups makes dessert feel more personal and accessible, especially when you’re short on time but craving something creamy and satisfying. It’s a reminder that sometimes, simplicity and a little creativity deliver the best sweets.
Sweet simplicity in individual cups
- Making these cups reminds me of lazy weekend mornings, where dessert feels like a small luxury I can whip up quickly.
- I used to think cheesecake needed baking, but these no-bake cups proved that less fuss can mean just as much delight.
- There’s a nostalgic comfort in the tangy creaminess, especially when topped with fresh berries and a drizzle of honey.
- Every time I serve these, I get that little spark of pride—simple ingredients, turned into something special and satisfying.
Inspiration Behind These Cups
This recipe came from a night when I was craving something sweet but didn’t want the usual fuss of a baked cheesecake. I remembered a summer picnic where I brought individual cups of creamy dessert, and everyone loved how easy and portable they were. Since then, I’ve been tinkering with different toppings and textures, always looking for that perfect balance of tangy, sweet, and smooth. It’s become my go-to for last-minute gatherings or when I just need a little dessert boost without the oven.
Historical Tidbits on No Bake Cheesecake Cups
- This recipe has roots in 1970s no-bake dessert trends, when convenience became key in home baking.
- The concept of individual cheesecake servings dates back to classic French patisserie, adapted for busy households.
- Originally, these cups were a picnic staple in the 1980s, prized for portability and minimal cleanup.
- Modern variations often incorporate vegan or gluten-free ingredients, reflecting evolving dietary preferences.
Ingredient breakdown: key components
- Cream cheese: I use full-fat, the way it melts into that silky texture makes all the difference—try to soften it well before mixing.
- Greek yogurt: Adds tang and creaminess; if you want it richer, swap in mascarpone—but beware, it’s denser and less tangy.
- Graham cracker crumbs: I crush mine finely for a smooth base; if you prefer a crunch, leave some larger bits for texture.
- Sweetener: I often go light on sugar, letting the tang shine through—feel free to adjust to your sweetness level.
- Lemon juice: Brightens everything with a zing; if you don’t have fresh, a splash of bottled lemon works, but fresh is best for that crackling citrus aroma.
- Toppings: Berries and whipped cream add freshness—use what’s seasonal or what you love, because that’s where the magic happens.
- Optional add-ins: A dash of vanilla or a sprinkle of sea salt can elevate the flavor—experiment to find your perfect balance.
Spotlight on key ingredients
Cream cheese:
- I use full-fat for that silky, melt-in-your-mouth texture—soften it well or lumps will sneak in.
- Greek yogurt: Adds a tangy, creamy zing; if you want richer, swap in mascarpone but watch for density and flavor.
- Vivid lemon juice: Brightens everything with a crackling citrus aroma; fresh is best, bottled works in a pinch.
Toppings and sweeteners:
- Graham cracker crumbs: I crush mine finely for a smooth base; leave some larger bits if you love a crunch in every bite.
- Fresh berries: Juicy and bright, they add vibrant color and a pop of tartness—seasonal berries shine here.
- Honey or simple syrup: Adds that touch of natural sweetness; a little goes a long way to balance the tang.
Notes for ingredient swaps
- Dairy-Free: Swap cream cheese for a cashew-based cream cheese alternative. It’s nuttier and a bit thinner, but still creamy.
- Low-Sugar: Use a sugar substitute like erythritol or stevia to cut sweetness without losing texture. Adjust to taste.
- Gluten-Free: Replace graham crackers with gluten-free cookie crumbs or crushed rice cereal for a similar crunch.
- Vegan: Use coconut yogurt and vegan cream cheese to keep it plant-based while maintaining that tangy, creamy bite.
- Lemon Variations: Lime or orange juice can replace lemon for a different citrus twist—bright and zesty, but slightly different flavor profiles.
- Sweetener: Honey or maple syrup can substitute powdered sugar, adding a richer, more complex sweetness—just add a little at a time.
- Toppings: Fresh fruit, chopped nuts, or edible flowers make great alternatives to berries, adding texture and color.
Equipment & Tools
- Small mixing bowl: To blend the cheesecake filling.
- Spoon or spatula: For mixing and filling cups.
- Mini cups or jars: To serve individual cheesecake portions.
- Food processor or zip-top bag and rolling pin: To crush graham crackers efficiently.
- Refrigerator: To set the cheesecake and keep it cold.
Step-by-step to perfect cheesecake cups
- Gather your equipment: a small mixing bowl, a spoon or spatula, and mini serving cups or jars.
- In a bowl, beat 8 oz (225 g) softened cream cheese until smooth and creamy, about 1-2 minutes.
- Add 1/2 cup (120 g) Greek yogurt, 1/4 cup (30 g) powdered sugar, and 1 tsp (5 ml) lemon juice. Mix until well combined, smooth, and slightly fluffy.
- Crush 6-8 graham crackers into fine crumbs; you can do this in a zip-top bag with a rolling pin or using a food processor.
- Stir the crumbs into the cream cheese mixture until evenly incorporated.
- Spoon or pipe the filling into your cups, filling each about three-quarters full.
- Chill in the fridge for at least 2 hours, or until the filling is set and slightly firm to the touch.
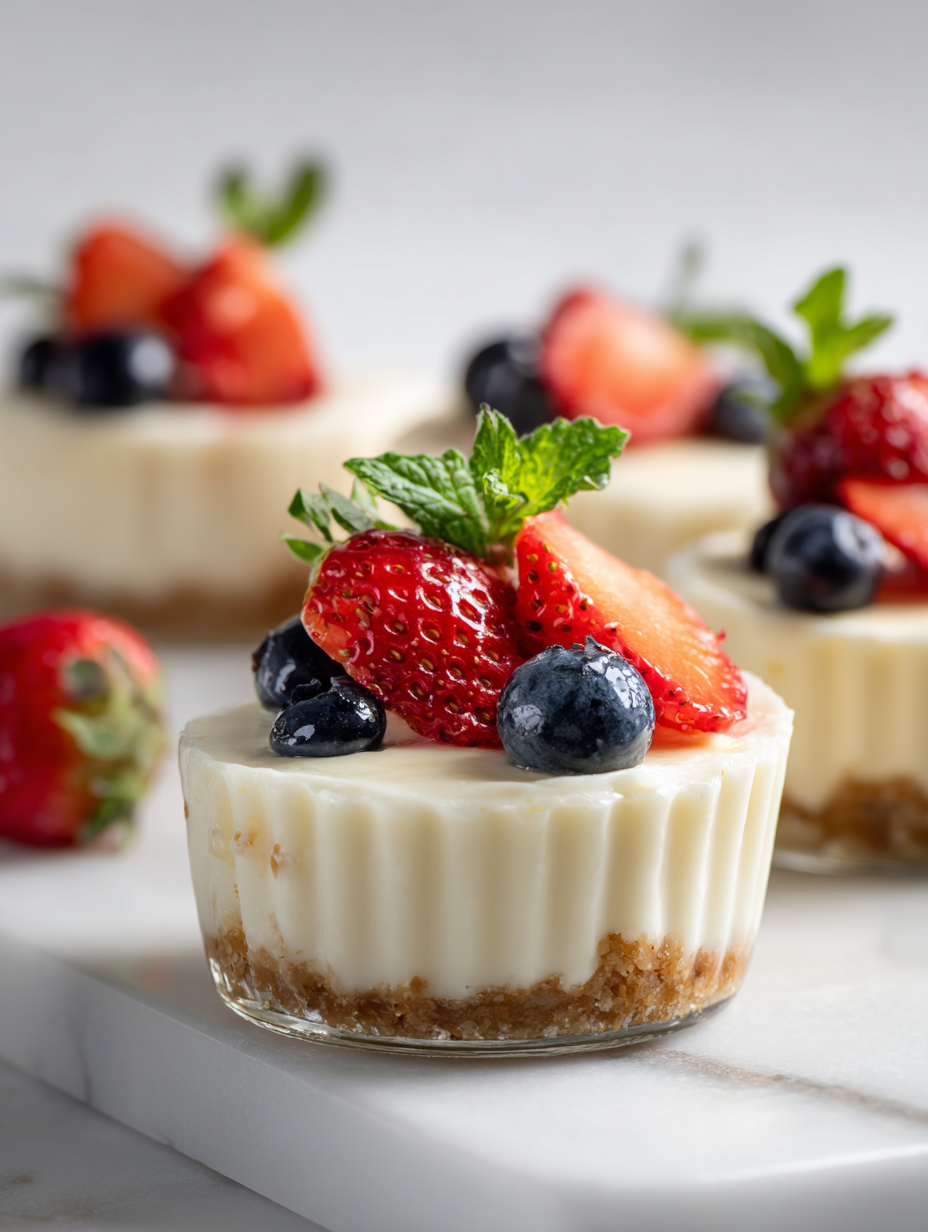
- Once chilled, top each cup with fresh berries, a dollop of whipped cream, or your favorite toppings. Serve cold.
Let the cheesecakes rest in the fridge for at least 2 hours to set. Finish with toppings just before serving to keep them fresh and vibrant. Serve chilled, directly from the fridge for the best texture and flavor.
How to Know It’s Done
- Filling is smooth and lump-free before filling cups.
- Cups are chilled until firm, with a slight jiggle in the center when gently shaken.
- Toppings hold shape and look vibrant, not watery or wilted.
No Bake Cheesecake Cups
Ingredients
Equipment
Method
- In a small mixing bowl, beat the softened cream cheese with a spoon or spatula until smooth and creamy, about 1-2 minutes. The mixture should be silky and free of lumps.
- Add the Greek yogurt, powdered sugar, and lemon juice to the cream cheese. Mix well until fully combined and slightly fluffy, resulting in a tangy, creamy filling.
- Crush the graham crackers into fine crumbs using a food processor or by placing them in a zip-top bag and rolling over them with a rolling pin. Stir the crumbs into the cream cheese mixture until evenly incorporated, creating a smooth crust base.
- Spoon or pipe the filling into mini cups or jars, filling each about three-quarters full. Gently tap each cup on the counter to remove air bubbles and even out the surface.
- Place the cups in the refrigerator and chill for at least 2 hours until the filling is set and firm to the touch. The texture will be silky and slightly jiggly when ready.
- Just before serving, top each cup with fresh berries or your favorite toppings for a burst of color and flavor. Serve cold for the best creamy texture and vibrant appearance.
Pro tips for perfect cheesecake cups
- Bolded mini-head: Chill the filling thoroughly → helps it set faster and keeps the texture firm, not runny.
- Bolded mini-head: Use room temperature cream cheese → mixes smoothly without lumps, ensuring a silky finish.
- Bolded mini-head: Crush graham crackers finely → creates a smooth crust that holds together better when layered.
- Bolded mini-head: Incorporate toppings just before serving → preserves vibrant colors and fresh textures.
- Bolded mini-head: Gently tap filled cups on the counter → releases air bubbles and evens out the filling for a smooth top.
- Bolded mini-head: Use a piping bag for filling → offers cleaner, more precise layers and a professional look.
- Bolded mini-head: Chill for a minimum of 2 hours → allows the cheesecake to set properly, avoiding runny bites.
Common mistakes and how to fix them
- FORGOT to chill the filling → Chill for at least 2 hours before serving.
- DUMPED in all ingredients at once → Add ingredients gradually, mixing well after each addition.
- OVER-TORCHED the crust → Keep a close eye; aim for golden crumbs, not burnt bits.
- MISSED the set test → Jiggle the cups gently; filling should wobble slightly but hold shape.
Quick fixes and pantry swaps
- If the filling is too runny, splash in a little more softened cream cheese and mix well.
- When the crust cracks while filling, patch with a dab of extra filling and smooth over.
- Splash a bit of lemon juice if the topping dulls in color or flavor—brighten it instantly.
- Dumped in too much sugar? Shake in a pinch more lemon juice for balance and zing.
- When toppings shimmer with moisture, shield with a light dusting of powdered sugar or crushed nuts.
Prep, store, and reheat tips
- Prepare the cheesecake filling and crush the graham crackers a day in advance. Keep the filling covered in the fridge; it will develop a richer tang and set more fully overnight.
- Assemble the cups up to three hours ahead of serving. Cover loosely and store in the fridge; the texture will firm up and flavors meld better.
- Shelf life is best within 2 days for optimal freshness. After that, the crust may soften and toppings may wilt slightly, so plan accordingly.
- Reheat is unnecessary; serve cold straight from the fridge. If you want slightly softer filling, let it sit at room temperature for 10 minutes and enjoy the creamy, cool contrast.
- Add fresh toppings just before serving to preserve vibrant color and crispness. Berries and whipped cream are especially perishable, so use close to serving time.
Top questions about no bake cheesecake cups
1. Can I use light cream cheese?
Yes, using full-fat cream cheese gives the best creamy texture and tang. Light versions tend to be less smooth.
2. Can I make these dairy-free?
Absolutely. Coconut yogurt or cashew-based alternatives work well, but expect a slightly different flavor and texture.
3. How long do I chill the cheesecake cups?
Chill the cups for at least 2 hours until set. Gently jiggle; the filling should wobble slightly but hold shape.
4. Can I make the filling in advance?
Yes, you can prepare the filling a day ahead. Keep it covered in the fridge to let the flavors meld.
5. How should I store and top these?
Use fresh berries or fruits just before serving for the best color and flavor. Toppings can soften if stored too long.
6. What if the filling is too runny?
If the filling is too runny, add a bit more softened cream cheese and mix until smooth. Chill again if needed.
7. Can I use other types of cookies for the crust?
Graham cracker crumbs should be crushed finely for a smooth crust. Leave some larger bits if you prefer crunch.
8. How do I fill the cups neatly?
Use a piping bag or a spoon for cleaner filling. Tap the cups gently to remove air bubbles and even out the top.
9. What if my toppings become soggy?
If the topping is wilting or watery, add a light dusting of powdered sugar or nuts for texture and absorbance.
10. Should I serve these at room temperature or cold?
Serve these cold straight from the fridge. If softer texture is preferred, let sit at room temp for 10 minutes.
These no bake cheesecake cups are a little reminder that dessert doesn’t need to be complicated or hot to be satisfying. They’re perfect for spontaneous gatherings or just a quiet moment when you want something creamy and cool. Honestly, they’re so easy that I find myself making them on a whim more often than I’d admit.
In the end, it’s about those small, simple pleasures—crisp crust, tangy filling, and fresh toppings—that make these cups special. They’re a quick fix for a craving and a little treat that feels like a reward, no matter the day. Sometimes, that’s all I need to keep going.

Hi, I’m Madison Lane, the cook, recipe creator, and heart behind this kitchen. Food has been part of my life for as long as I can remember. Some of my earliest memories are of standing beside my dad while he cooked, watching him move comfortably around the kitchen, tasting sauces, and explaining why patience mattered just as much as seasoning.
