There’s something irresistibly satisfying about that first bite of cookie dough—soft, sweet, and just a little bit gooey. But as much as I love raw cookie dough, I’ve always hesitated because of the raw eggs and flour. So I started experimenting with no-bake bites that capture that nostalgic flavor without the risk, and honestly, these have become my go-to snack for whenever that craving hits.
Making these cookie dough bites is like a little act of rebellion—no oven, no fuss, just quick mixing and chilling. They’re perfect for when I want a treat that feels indulgent but doesn’t demand much time or effort, especially after a long day. Plus, sharing them with friends feels like passing around a secret that everyone secretly loves.
Focusing on creating a nostalgic treat that mimics raw cookie dough without the raw eggs or flour, perfect for safe snacking and sharing.
Nostalgic bites with a twist
- These bites remind me of lazy weekend afternoons spent baking with my grandma, laughter mixing with the smell of vanilla and melting chocolate.
- Craving comfort but short on time, I love how these little pockets of cookie dough satisfy that sweet tooth without any baking fuss.
- They’re my secret weapon for quick gatherings—everyone’s surprised how such simple ingredients turn into this rich, nostalgic treat.
Nostalgic bites with a twist
This recipe came about during a late-night craving for something sweet and familiar, but I was out of eggs and flour. I started mixing up ingredients I had on hand—butter, sugar, vanilla—and realized I could mimic the flavor and texture of cookie dough without the raw risks. It’s become a little ritual for me, blending nostalgia with practicality, especially on those nights when I need a quick, satisfying bite that feels like a treat but is totally fuss-free.
Historical & Cultural Tidbits
- These no-bake bites originated from a desire to enjoy the flavor of raw cookie dough without the health risks associated with raw eggs and flour.
- They gained popularity in the early 2000s when food safety conversations pushed for safer, no-bake dessert options that still satisfy that craving for raw dough.
- Many home cooks started experimenting with simple ingredients like nut butters and oats, creating these bites as a quick, nostalgic treat.
- The trend reflects a broader movement towards safer, faster, and more customizable snack options that still deliver a rich, indulgent flavor.
Key Ingredients Breakdown
- Butter: I love how the butter gives these bites that rich, melt-in-your-mouth feel—use unsalted for a cleaner flavor, or salted if you want a little extra punch that balances the sweet.
- Brown Sugar: It adds that warm, caramelized sweetness and a slight chewiness. If you’re out, maple syrup can be a good swap, but it’ll change the texture a bit.
- Vanilla Extract: I always go for pure vanilla; it brightens everything and gives that familiar cookie dough aroma. Almond extract is a sneaky twist if you want a different vibe.
- Chocolate Chips: I prefer semi-sweet or dark for depth, but milk chocolate melts into a creamy pool that’s hard to resist—try swapping with chopped nuts for crunch.
- Oats: Old-fashioned oats give a hearty bite and chewy texture, but if you want something finer, crushed graham crackers or even cookie crumbs can mimic that.
- Sweetened Condensed Milk: This is the glue that keeps everything together, making the bites oozy and cohesive. Coconut condensed milk can add a tropical twist, but it’s richer.
- Salt: Just a pinch enhances all the sweetness and adds a subtle contrast, so don’t skip it—even if you’re tempted to leave it out.
Spotlight on key ingredients
Butter:
- I love how the butter gives these bites that rich, melt-in-your-mouth feel—use unsalted for a cleaner flavor, or salted if you want a little extra punch that balances the sweet.
- Brown Sugar: It adds that warm, caramelized sweetness and a slight chewiness. If you’re out, maple syrup can be a good swap, but it’ll change the texture a bit.
- Vanilla Extract: I always go for pure vanilla; it brightens everything and gives that familiar cookie dough aroma. Almond extract is a sneaky twist if you want a different vibe.
Chocolate Chips and Oats:
- Chocolate Chips: I prefer semi-sweet or dark for depth, but milk chocolate melts into a creamy pool that’s hard to resist—try swapping with chopped nuts for crunch.
- Oats: Old-fashioned oats give a hearty bite and chewy texture, but if you want something finer, crushed graham crackers or even cookie crumbs can mimic that.
- Sweetened Condensed Milk: This is the glue that keeps everything together, making the bites oozy and cohesive. Coconut condensed milk can add a tropical twist, but it’s richer.
Notes for ingredient swaps
- Dairy-Free: Coconut oil or vegan butter can replace regular butter, but expect a slightly different richness and melt-in-your-mouth feel.
- Sweetener: Maple syrup or agave nectar can substitute brown sugar—these will add moisture and a different depth of sweetness.
- Oats: Use crushed graham crackers or cookie crumbs if you want a finer, more uniform texture, but it will change the hearty chew.
- Chocolate: Swap mini chocolate chips for chopped nuts or dried fruit for a different crunch and flavor profile.
- Condensed Milk: Coconut condensed milk adds tropical flavor, but makes the bites richer and slightly coconutty.
- Flavor Boost: Almond extract can replace vanilla for a nuttier aroma, but it’s stronger—use half the amount to start.
- Add-ins: Dried cranberries or chopped dried apricots can replace chocolate chips, offering a tart contrast and chewy bite.
Equipment & Tools
- Medium mixing bowl: To combine and mix ingredients
- Microwave: To melt butter quickly and evenly
- Measuring cups and spoons: To measure ingredients accurately
- Small cookie scoop or tablespoon: To portion out uniform bites
- Parchment paper: To prevent sticking and easy cleanup
- Tray or plate: To hold the shaped bites during chilling
- Spatula or spoon: To mix and fold ingredients
Step-by-step guide to cookie dough bites
- Gather all ingredients and equipment. Chill your mixing bowl and spoon in the freezer for 10 minutes to prevent sticking.
- In a medium bowl, melt 1/2 cup (120g) of butter in the microwave on 30% power for about 30 seconds. Let cool slightly.
- Add 1/2 cup (100g) brown sugar and 1 teaspoon vanilla extract to the melted butter. Mix until well combined and no lumps remain, about 1 minute.
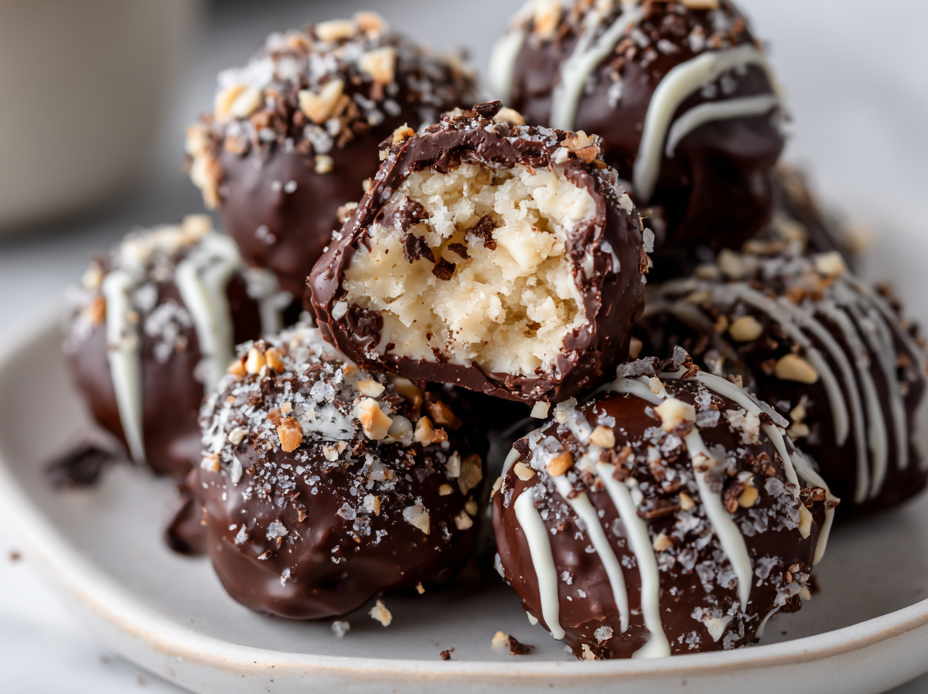
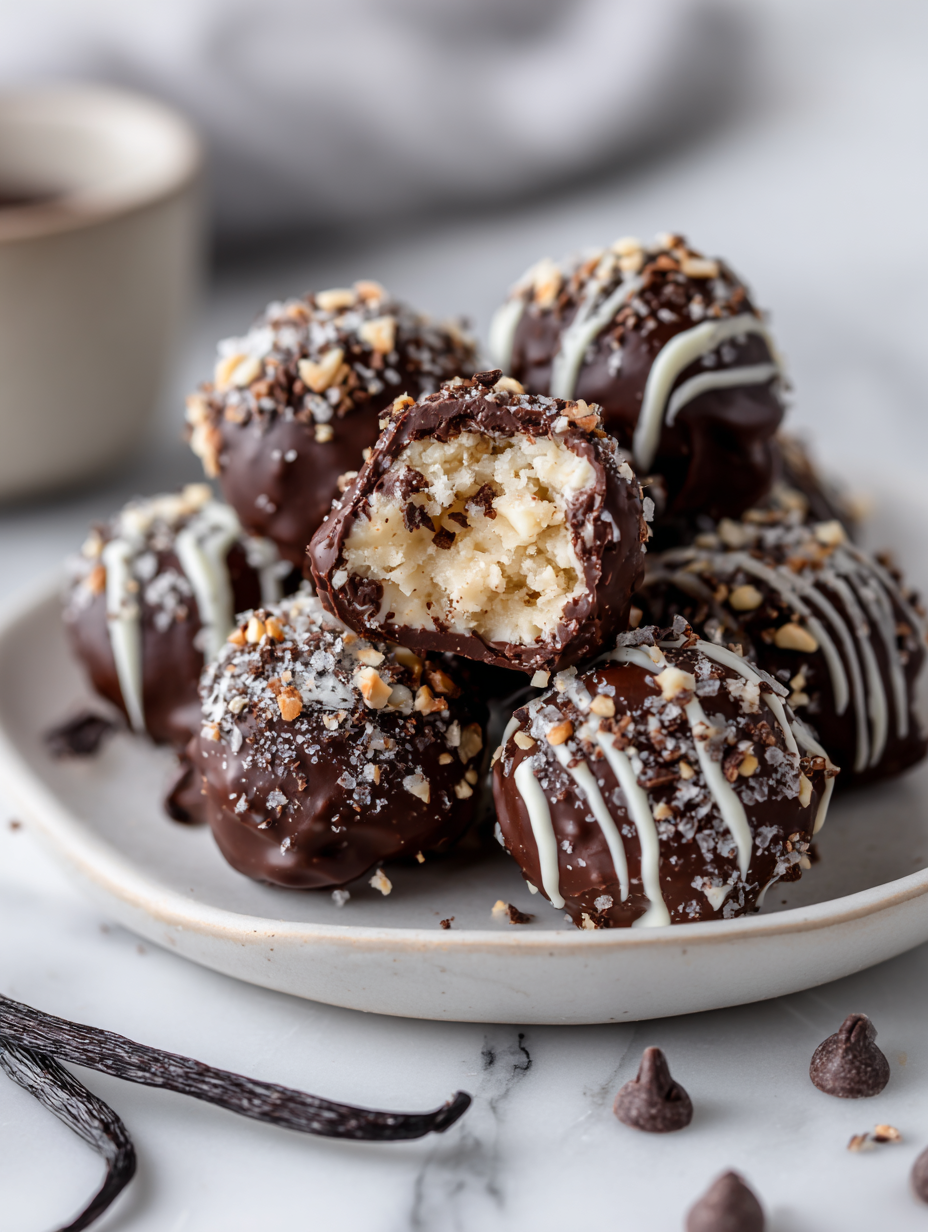
- Stir in 1 1/2 cups (135g) of rolled oats and 1/2 cup (90g) of mini chocolate chips. Mix until evenly distributed; the mixture should be thick and slightly sticky.
- Pour in 1/4 cup (60ml) of sweetened condensed milk. Mix vigorously until the mixture becomes cohesive and glossy, about 2 minutes.
- Using a small cookie scoop or tablespoon, portion out the mixture and roll into balls about 2 inches in diameter. Place on a parchment-lined tray.
- Chill the bites in the freezer for at least 30 minutes, or until firm. Do not skip this step; it helps set the shape and texture.
- Optional: Melt a few more chocolate chips and drizzle over the bites for extra flair. Let set for 10 minutes at room temperature.
- Serve straight from the fridge or at room temperature. Keep leftovers in an airtight container in the fridge for up to 1 week.
Chill the cookie dough bites in the freezer for at least 30 minutes until firm. Serve straight from the fridge or at room temperature. For best texture, enjoy within a week stored in an airtight container.
How to Know It’s Done
- Mixture is thick, sticky, and holds shape when rolled.
- Chocolate chips are evenly distributed and coated.
- Bites are firm but not hard after chilling, with a slightly glossy appearance.
No-Bake Cookie Dough Bites
Ingredients
Equipment
Method
- Microwave the butter in a microwave-safe bowl on 30% power for about 30 seconds until melted and fragrant.
- Add the brown sugar and vanilla extract to the melted butter. Stir with a spatula until the mixture is smooth, glossy, and the sugar begins to dissolve.
- Pour in the rolled oats and mini chocolate chips, folding gently to combine and distribute evenly throughout the mixture.
- Stir in the sweetened condensed milk vigorously until the mixture becomes thick, glossy, and cohesive—this helps everything stick together.
- Using a small cookie scoop or tablespoon, portion out the mixture and roll into compact balls about 2 inches in diameter.
- Place the cookie dough bites on a parchment-lined tray or plate, spacing them slightly apart.
- Chill the bites in the freezer for at least 30 minutes until firm and set, which makes them easier to handle and enhances their chewy texture.
- If desired, melt a few more chocolate chips and drizzle over the chilled bites for extra visual appeal. Let them set for about 10 minutes at room temperature.
- Serve the cookie dough bites straight from the fridge or at room temperature for a soft, chewy, and indulgent treat that tastes just like raw cookie dough.
Tips for perfect cookie dough bites
- Chill your tools: Cold bowls and spoons prevent the mixture from getting too soft during mixing.
- Use room temperature butter: It blends more smoothly, giving a uniform texture without lumps.
- Add chocolate chips last: Fold them in gently to keep them from melting and losing their shape.
- Adjust sweetness: Taste the mixture before chilling; add a pinch more sugar if you want it sweeter.
- Don’t overmix: Mix just until combined to keep the bites tender and avoid a dense texture.
- Freeze for firmness: Chill the bites in the freezer until they’re firm and easy to handle—about 30 minutes.
- Serve at room temp: Let chilled bites sit out 5 minutes for a softer, more indulgent experience.
Common mistakes and how to fix them
- FORGOT to measure ingredients precisely → Use a scale for accuracy.
- DUMPED too much salt → Reduce or omit salt to prevent overpowering sweetness.
- OVER-TORCHED the chocolate → Melt chocolate gently on low heat or in short bursts.
- MISSED the chilling step → Always chill until firm to set the bites properly.
Quick fixes and pantry swaps
- When mixture is too sticky → Splash in a little milk to loosen it up.
- If bites are soft after chilling → Patch with a quick freeze for 10 minutes.
- DUMPED too much salt → Reduce or omit salt to prevent overpowering sweetness.
- When chocolate shimmers or crackles → Shield from direct heat and melt gently on low.
- When ingredients seem dry or crumbly → Swap with a touch more condensed milk for cohesion.
Prep, store, and reheat tips
- Prepare the mixture ahead of time and keep it refrigerated for up to 24 hours; the flavors meld and it stays easy to scoop.
- Store the cookie dough bites in an airtight container in the fridge for up to one week; they become firmer but still delightfully chewy.
- For longer storage, freeze the bites in a single layer, then transfer to a zip-top bag. They’ll keep for up to 3 months.
- Reheat slightly in the fridge for 10 minutes or at room temperature to soften the bites and enhance the aroma before serving.
Top questions about cookie dough bites
1. Can I eat these without cooking the flour?
Yes, using heat-treated flour or oat flour reduces the risk, making them safer to eat raw.
2. Should I refrigerate the bites after making them?
Absolutely, they’re best chilled but also delicious at room temp, softening the fats for better flavor.
3. Can I substitute peanut butter for other nut butters?
Using natural peanut butter gives a richer, more peanutty flavor and softer texture, but any nut butter works.
4. How long should I chill the cookie dough bites?
Chilling for at least 30 minutes helps set the bites, making them easier to handle and improving texture.
5. Can I add toppings or mix-ins?
Adding extra chocolate chips on top before chilling adds visual appeal and bursts of chocolate in every bite.
6. My mixture is too sticky, what do I do?
If the mixture feels too sticky, add a bit more oats or a sprinkle of powdered sugar to firm it up.
7. What type of chocolate should I use?
Using dark or semi-sweet chocolate chips gives a richer flavor, but milk chocolate is sweeter and milder.
8. Can I make these vegan or dairy-free?
Yes, swapping maple syrup or honey for sugar adds moisture and a different flavor profile, but may change texture slightly.
9. How should I store leftover bites?
Keep leftovers in an airtight container in the fridge for up to a week, or freeze for longer storage.
10. When is the best time to serve these?
Serving them slightly softened brings out the full flavor and makes the texture creamier, especially if they’re chilled hard.
These no-bake cookie dough bites are my go-to when I need a quick, nostalgic fix without fuss. They remind me of lazy afternoons and the simple joy of sweet, creamy bites. No matter the season, they feel just right—rich, familiar, and satisfyingly easy.
Sharing these with friends or keeping them in the fridge for a rainy day always feels like a small victory. They’re imperfect, a little messy, but always a little bit loved—like good treats should be.

Hi, I’m Madison Lane, the cook, recipe creator, and heart behind this kitchen. Food has been part of my life for as long as I can remember. Some of my earliest memories are of standing beside my dad while he cooked, watching him move comfortably around the kitchen, tasting sauces, and explaining why patience mattered just as much as seasoning.
