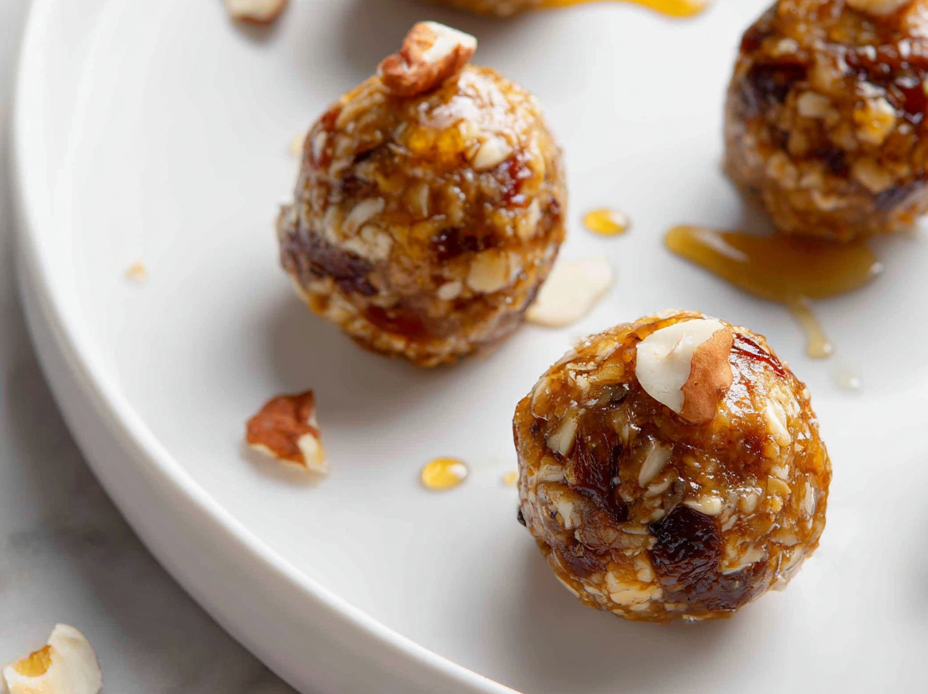
These no-bake date nut bites are like little energy parcels, perfect for when you need a quick, satisfying snack. I love how the dates bring natural sweetness and chewiness, while the nuts add crunch and richness. It’s a simple, honest recipe that feels almost too easy to be true.
What really hooks me is how versatile and forgiving this combination is. You can swap in different nuts, add a pinch of spice, or even toss in a few dark chocolate chips without messing up the texture. It’s the kind of recipe that makes you appreciate the humble date in a whole new way.
Plus, they store well in the fridge and take only minutes to prepare. No baking, no fuss—just pure, honest ingredients coming together into a little healthy treat that doesn’t feel like a compromise. Sometimes, the simplest snacks are the most satisfying, especially when they’re packed with good stuff.
Focusing on the surprising versatility of dates and nuts as a no-bake, energy-boosting snack that feels like a treat but is practically a health bomb.
Date Nut Bites: A Hidden Treasure
- I love how these bites turn a simple handful of dates and nuts into something unexpectedly indulgent, almost like a guilty pleasure without the guilt.
- There’s a quiet joy in making these—no oven, no fuss, just sticky, sweet, crunchy goodness that I can whip up in minutes.
- Sometimes, they remind me of childhood snacks, but with a grown-up twist—rich, chewy, and packed with wholesome flavor.
- I feel proud sharing these because they’re honest, accessible, and satisfy that craving for something sweet without overthinking it.
The story behind this recipe
This recipe came from a lazy afternoon when I was rummaging through my pantry, looking for something sweet but wholesome. I remember the moment I pressed the sticky date mixture into the tray, realizing how these humble ingredients could turn into a satisfying snack with just a little help. It’s funny how simplicity often leads to the best bites, especially when you’re craving something nutritious and quick. Now, I keep a batch in the fridge always—it’s my go-to for busy mornings or unexpected guests, and it never disappoints.
Historical & Cultural Roots
- Dates have been a staple in Middle Eastern diets for thousands of years, prized for their natural sweetness and energy-boosting properties.
- This no-bake concept likely originated from resourceful home cooks seeking quick, preservable snacks before modern refrigeration.
- Nut and date combinations were historically used by nomadic tribes to sustain energy during long journeys, making these bites a modern tribute to ancient survival snacks.
Ingredient breakdown
- Dates: I love how their natural caramel sweetness makes these bites irresistibly sticky and rich; if you want a milder flavor, try Medjool dates for a buttery note.
- Nuts: I prefer a mix of almonds and walnuts for crunch, but pistachios or pecans work beautifully if you want a different vibe or flavor profile.
- Honey: Just a touch helps bind everything together and enhances sweetness—skip or reduce if you want less sugar or use maple syrup for a plant-based touch.
- Cocoa powder: Adds a subtle chocolatey depth, but if you prefer a nutty flavor, skip it or swap for desiccated coconut for a different texture.
- Sea salt: I always sprinkle a tiny pinch to heighten the flavors—if you’re sensitive to salt, start with less and adjust to taste.
- Optional add-ins: A dash of vanilla or a few dark chocolate chips can elevate the bites; don’t be shy to experiment with spices like cinnamon or cardamom.
- Oil (like coconut or nut oil): Just a small amount helps if your mixture feels a bit dry or crumbly—use sparingly, as too much can make them greasy.
Spotlight on key ingredients
Dates:
- I love how their natural caramel sweetness makes these bites irresistibly sticky and rich; if you want a milder flavor, try Medjool dates for a buttery note.
- Nuts: I prefer a mix of almonds and walnuts for crunch, but pistachios or pecans work beautifully if you want a different vibe or flavor profile.
Nuts:
- Their crunch and richness contrast beautifully with the chewy dates, and they add a satisfying texture that keeps you coming back.
- Nuts can behave differently depending on size and moisture—toast them lightly for extra flavor and crunch before adding.
Notes for ingredient swaps
- Dairy-Free: Use coconut oil instead of butter for a richer, slightly coconut aroma that complements the dates.
- Nut-Free: Swap nuts for sunflower seeds or pumpkin seeds—still crunchy but less allergenic and more budget-friendly.
- Sweetener: Replace honey with maple syrup or agave nectar for a plant-based, slightly different flavor profile.
- Chocolate: Omit cocoa powder and add a handful of dried cranberries or goji berries for a tangy twist.
- Texture: For a crunchier bite, add a sprinkle of toasted coconut or sesame seeds on top before chilling.
- Fruit: Toss in dried apricots or cherries for a chewier bite with a hint of tartness, replacing some dates.
- Oil: Use a neutral-flavored oil like grapeseed or light avocado oil if you want a softer, more pliable mixture.
Equipment & Tools
- Food processor: Blend dates and nuts into a sticky mixture.
- Mixing bowl: Combine ingredients and hold the mixture.
- Spatula: Spread mixture evenly in the tray.
- Parchment paper: Prevent sticking and make cleanup easier.
- Sharp knife: Cut the chilled mixture into bites.
Step-by-step guide to no bake bites
- Gather your equipment: a food processor for blending, a mixing bowl, a spatula, and a baking tray lined with parchment paper.
- Pit the dates if they have pits, then roughly chop them to help with blending. Measure out the nuts, roughly chopped or whole if small.
- In the food processor, add the dates and pulse until they form a sticky, chunky paste, about 1-2 minutes. Scrape down sides as needed.
- Add the nuts to the processor. Pulse several times until the mixture is combined but still has some texture, about 30 seconds to 1 minute.
- Transfer the mixture to a bowl. If it feels too dry or crumbly, stir in a teaspoon of honey or a splash of warm water to help it come together.
- Using your hands or a spatula, press the mixture firmly into the prepared parchment-lined tray, spreading it evenly to about 1/2 inch thickness.
- Chill in the fridge for at least 30 minutes to firm up. This helps the bites hold their shape when cut.
- Once chilled, remove from fridge and cut into small squares or rectangles with a sharp knife. Clean the knife between cuts for clean edges.
- For a finishing touch, you can roll the bites in extra chopped nuts or a dusting of cocoa powder if desired.
- Store in an airtight container in the fridge for up to a week, or freeze for longer storage. Let come to room temp or slightly warm before serving if frozen.
Chill the tray in the fridge for at least 30 minutes. Once firm, cut into squares and optionally roll in extra nuts or cocoa powder. Store in an airtight container in the fridge or freezer, and serve at room temperature or slightly warm if frozen.
How to Know It’s Done
- Mixture is sticky and holds together when pressed.
- Edges are clean and bites are uniform in size.
- Fridge time is complete and bites are firm but not hard.

No-Bake Date Nut Bites
Ingredients
Equipment
Method
- Place the pitted dates into your food processor and pulse until they break down into a sticky, chunky paste, about 1-2 minutes, scraping down the sides as needed.
- Add the chopped nuts to the food processor and pulse a few times until they're roughly chopped and well combined with the dates, keeping some texture.
- Transfer the mixture to a mixing bowl and stir in honey, cocoa powder, vanilla extract, and a tiny pinch of sea salt until everything is evenly incorporated and the mixture feels sticky and cohesive.
- Using your hands or a spatula, press the mixture firmly into a parchment-lined baking tray, spreading it out evenly to about 1/2 inch thick. This helps it stick together and makes cutting easier later.
- Place the tray in the fridge and chill for at least 30 minutes until the mixture is firm and easy to cut.
- Remove the tray from the fridge and lift out the set mixture using the parchment paper. Use a sharp knife to cut into small squares or rectangles, wiping the knife clean between cuts for neat edges.
- If desired, roll each bite in extra chopped nuts or cocoa powder for added texture and flavor.
- Store the bites in an airtight container in the fridge for up to a week, or freeze for longer storage. Let them sit at room temperature for a few minutes before serving for the best texture.
Pro tips for perfect bites
- Bolded mini-head: Chill mixture briefly → Helps it firm up and makes cutting easier, especially on warm days.
- Bolded mini-head: Use cold hands when pressing → Prevents the mixture from sticking and gives a cleaner edge.
- Bolded mini-head: Toast nuts lightly → Releases oils and enhances crunch, making bites more flavorful.
- Bolded mini-head: Pulse, don’t overmix → Keeps a bit of texture in the nuts and prevents a paste-like consistency.
- Bolded mini-head: Add a splash of warm water → Loosens dry mixture without making it greasy, aiding spreading.
- Bolded mini-head: Store in airtight container → Keeps bites fresh and chewy; moisture stays controlled.
- Bolded mini-head: Slightly warm before serving → Brings out the aroma and softens the texture for better bite experience.
Common mistakes and how to fix them
- FORGOT to measure ingredients precisely → Use measuring cups/spoons for accuracy.
- DUMPED mixture into pan without pressing → Firmly press mixture for even bites.
- OVER-TORCHED nuts or dates → Toast or process just until fragrant and sticky, not burnt.
- FAILED to chill properly → Chill at least 30 minutes for firm, clean cuts.
Quick fixes and pantry swaps
- When mixture feels dry → Splash with a teaspoon of warm water and knead briefly.
- If bites are crumbly → Patch with a thin layer of honey or nut butter before chilling.
- Splash melted chocolate for coating → Shield with a steady hand to prevent cracks and shimmer.
- When nuts are too oily → Swap for toasted seeds to keep crunch without extra oil.
- Dumped in too much oil → Rescue by adding more chopped dates or nuts to absorb excess moisture.
Prep, store, and reheat tips
- You can prepare the mixture a day ahead; keep it covered in the fridge to maintain freshness and prevent drying out.
- Store the finished bites in an airtight container in the fridge for up to a week. They stay chewy and flavorful, with the dates mellowing slightly over time.
- For longer storage, freeze the bites for up to a month. Wrap them individually in parchment or foil for easy grabbing.
- Reheat by letting them sit at room temperature for 10-15 minutes or briefly warming in a low oven (around 150°C/300°F) until just soft and fragrant. The texture will soften slightly, and the aroma of nuts and dates will intensify.
Top questions about no bake date nut bites
1. Can I use other dried fruits instead of dates?
Yes, you can swap out dates for dried figs or apricots, but it may change the chewiness and sweetness slightly.
2. Can I customize the flavor with spices or extracts?
Absolutely, adding a pinch of cinnamon or a splash of vanilla can deepen the flavor and add warmth.
3. My mixture is too sticky or dry, how do I fix it?
Yes, if the mixture feels too sticky, add a bit more chopped nuts; if too dry, a tiny drizzle of honey helps.
4. How long should I chill the mixture before cutting?
Chill the mixture for at least 30 minutes; it firms up enough to cut cleanly and keeps its shape.
5. How should I store the bites for freshness?
Store in an airtight container in the fridge for up to a week or freeze for up to a month for longer storage.
6. Can I add coatings or toppings?
Yes, you can roll the bites in shredded coconut, cocoa powder, or chopped nuts for extra texture and flavor.
7. How do I get clean cuts without squishing the bites?
Use a sharp knife and wipe it clean between cuts for neat, even pieces.
8. My bites are crumbly, what can I do?
If they’re too crumbly, add a little warm honey or a splash of water to help bind the mixture.
9. Can I make these ahead of time?
You can prepare the mixture the night before; just keep it covered in the fridge until ready to shape.
10. Should I serve them cold or at room temperature?
Yes, for best texture, serve at room temperature or slightly warmed from the fridge for a softer bite.
These no-bake date nut bites are more than just a quick snack—they’re a little moment of honest simplicity in a busy day. The way the sweet dates and crunchy nuts come together feels both familiar and surprising, especially when you realize how easy they are to make. It’s a small reminder that good things don’t always need fuss or heat.
Whenever I make these, I think about how humble ingredients can turn into something satisfying and nourishing, almost like a secret treat waiting in the fridge. They’re perfect for when you want something honest, a bit indulgent but still wholesome, and ready in minutes. A simple pleasure that I keep coming back to, season after season.

Hi, I’m Madison Lane, the cook, recipe creator, and heart behind this kitchen. Food has been part of my life for as long as I can remember. Some of my earliest memories are of standing beside my dad while he cooked, watching him move comfortably around the kitchen, tasting sauces, and explaining why patience mattered just as much as seasoning.
