These no bake energy balls are like tiny bites of childhood comfort, but with a modern twist. I remember sneaking them from my lunchbox, the chewy oats and sweet honey making everything feel simpler, safer. Now, they’re my go-to when I need a quick, honest snack that doesn’t ask for heat or fuss.
Making these feels almost nostalgic—mixing sticky dates, crunchy nuts, and a splash of vanilla. It’s a reminder that sometimes, the best treats are the easiest, no need for ovens or fancy ingredients. They fit into busy mornings, quick afternoons, or whenever you crave something familiar and satisfying.
Focusing on the nostalgic comfort of childhood snacks with a modern, health-conscious twist, these no bake energy balls evoke memories of school lunches and weekend treats, but with a simple, no-fuss approach that fits into busy adult lives.
Nostalgic bites with a modern twist
- These energy bites remind me of childhood afternoons, where simple ingredients brought instant joy and comfort.
- I love how quick and forgiving they are—no oven, no fuss, just a sticky, sweet mess that turns into something satisfying.
- There’s a nostalgic charm in the chewiness of oats mixed with that hint of honey and vanilla, perfectly balanced.
- Making these on a hectic morning feels almost like a small act of rebellion against the rush—just scoop, roll, and go.
- They’re my secret weapon for busy days, a little treat that’s honest, portable, and always hits the spot.
The story behind this recipe
- This recipe came out of a chaotic weekend when I needed something quick and nourishing without turning on the oven. I was tired but craving a little sweet, energy boost that I could grab and go. It’s funny how a simple mixture of oats, nut butter, and honey can turn into a handful of comfort, all made without heat or fuss.
- Once I got the proportions right, I realized these little bites are more than just snacks—they’re a tiny act of rebellion against busy, hurried days. They remind me that sometimes, the simplest ingredients, mixed with a bit of intention, make the best treats. Now, they’re my standby for mornings when I’m running late or afternoon dips.
- heading: ‘The story behind this recipe
Historical and Cultural Roots
- These energy balls trace back to ancient snack traditions where no heat was used, emphasizing simplicity and portability.
- They gained popularity in the health food movement of the early 2000s, emphasizing quick, no-fuss nutrition.
- The concept of bite-sized, no-bake snacks emerged from necessity—perfect for busy lives and minimal kitchen tools.
- Many versions of energy bites incorporate ingredients like dates and nuts, which have long been valued for their energy-boosting qualities.
Key Ingredients Breakdown
- Dates: I love how they bring a sticky, caramel-like sweetness that makes the bites feel indulgent. If you prefer less gooeyness, try soaking them briefly in warm water before blending.
- Oats: Rolled oats add that chewy texture and nutty flavor I crave. For a bit more crunch, toss in some toasted oats or swap half for steel-cut oats, but expect a denser bite.
- Nut Butter: Creamy peanut butter is my go-to for richness, but almond or cashew butters work well too. If you want a smoother texture, warm it slightly before mixing—just watch out for drips.
- Honey: It’s the glue that keeps everything together and adds a sweet, floral aroma. Swap honey for maple syrup or agave if you want a different flavor profile, but reduce the liquid slightly.
- Add-ins: Chocolate chips, dried cranberries, or shredded coconut make these more fun. I like how they surprise each bite—just don’t overload, or they get messy to eat.
- Vanilla Extract: It enhances the overall flavor with a warm aroma. For a twist, add a pinch of cinnamon or a splash of almond extract—just a tiny bit for depth.
- Salt: A pinch balances sweetness and heightens flavors. Skip it if you’re making these for someone who’s watching sodium, but don’t skip the flavor enhancer!
Spotlight on key ingredients
Dates:
- I love how they bring a sticky, caramel-like sweetness that makes the bites feel indulgent. If you prefer less gooeyness, try soaking them briefly in warm water before blending.
- Oats: Rolled oats add that chewy texture and nutty flavor I crave. For a bit more crunch, toss in some toasted oats or swap half for steel-cut oats, but expect a denser bite.
Nut Butter & Honey:
- Nut Butter: Creamy peanut butter is my go-to for richness, but almond or cashew butters work well too. If you want a smoother texture, warm it slightly before mixing—just watch out for drips.
- Honey: It’s the glue that keeps everything together and adds a sweet, floral aroma. Swap honey for maple syrup or agave if you want a different flavor profile, but reduce the liquid slightly.
Notes for ingredient swaps
- Dairy-Free: Swap honey for maple syrup or agave. It keeps things vegan but may alter the sweetness and aroma slightly.
- Nut Butter: Almond or cashew butter can replace peanut butter for a different nutty flavor. Expect a slightly different texture and richness.
- Sweetener: Use coconut sugar or brown sugar instead of honey for a deeper caramel note, but expect a slightly drier mixture.
- Oats: Gluten-free rolled oats work if you need to keep it GF. They taste similar but may have a slightly different chew.
- Add-ins: Dried fruits, chocolate chips, or shredded coconut can be swapped based on your preference. They add texture and flavor variety.
- Binding Agent: If you’re out of honey or syrup, mashed banana can work but will bring a different moisture and flavor profile.
- Flavor Enhancer: A splash of vanilla extract can be replaced with almond or lemon extract for a different aroma, but keep it minimal to avoid overpowering.
Equipment & Tools
- Food processor: To finely chop dates and blend ingredients into a sticky dough.
- Mixing bowl: To combine and hold the mixture before shaping.
- Baking sheet with parchment: To hold the formed balls while chilling and coating.
- Small scoop or spoon: To portion out even-sized pieces for rolling.
- Hands: For rolling and shaping the energy balls.
Step-by-step guide to energy balls
- Gather all ingredients and tools on your counter—preparedness makes assembly smoother. Use a mixing bowl, food processor, and a baking sheet lined with parchment.
- Pulse the dates in the food processor until finely chopped and slightly sticky, about 30 seconds. They should clump together when pinched—if not, add a tiny splash of water and pulse again.
- Add the oats, nut butter, honey, vanilla, and a pinch of salt to the processor. Blend until the mixture is well combined and sticky, about 20-30 seconds. It should hold together when pressed—if too crumbly, drizzle in a teaspoon of water and pulse briefly.
- Scrape the mixture into the bowl. Using a small scoop or your hands, portion out about 1-2 tablespoon-sized pieces. Roll each into a ball between your palms, pressing firmly so they stick together. If the mixture feels too dry, add a touch more honey or nut butter.
- Place the formed balls onto the prepared baking sheet, spacing them about 2 inches apart. For a firmer texture, refrigerate for at least 30 minutes—this helps set the bonds and makes rolling easier.
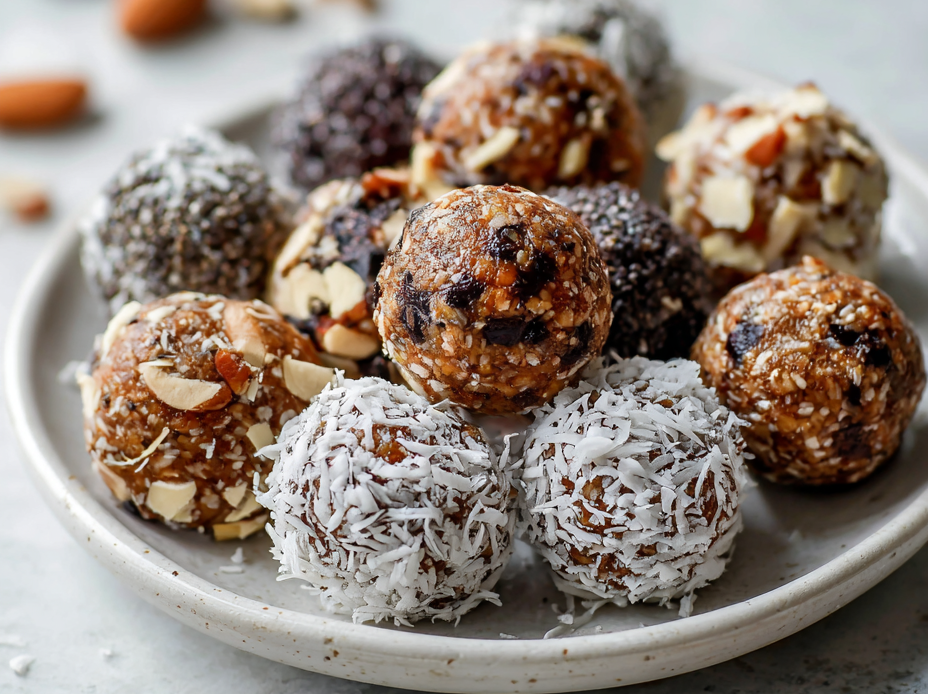
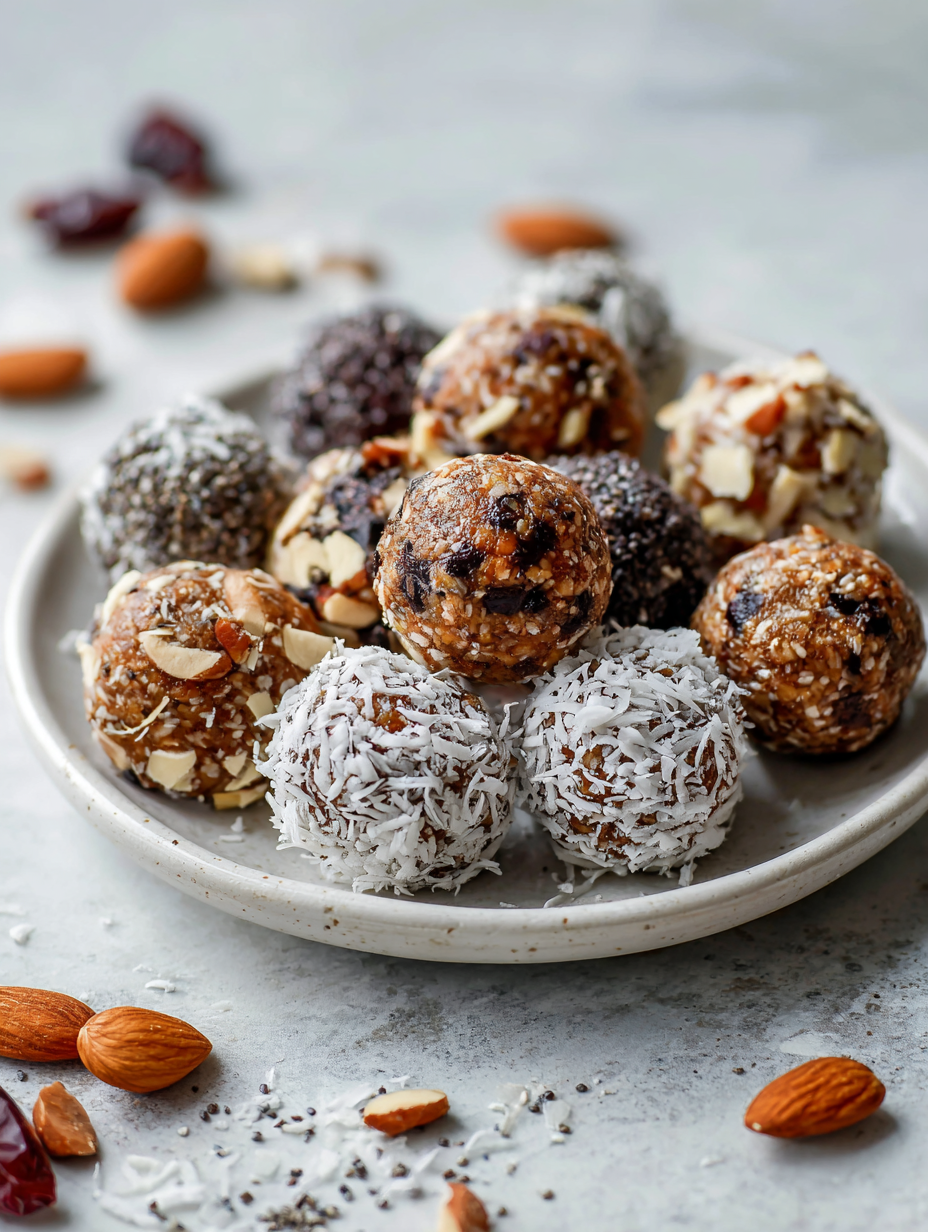
- Optional: Roll the balls in shredded coconut, chopped nuts, or cocoa powder for extra flavor and texture. Gently press the coating onto the surface to adhere.
- Once chilled and coated, transfer the energy balls to an airtight container. Store in the fridge for up to a week or freeze for up to a month. They’re ready to grab and go whenever you need a quick energy boost.
Chill the balls in the fridge for at least 30 minutes to set. Serve straight from the fridge or at room temperature for softer texture. Store in an airtight container—refrigerate for up to a week or freeze for longer storage. Enjoy straight from the fridge for a chewy, cool treat or let sit at room temp for a softer bite.
How to Know It’s Done
- Mixture should be sticky enough to roll without crumbling.
- Balls hold their shape firmly after refrigeration.
- A slight sheen on the surface indicates proper moisture level.
No Bake Energy Balls
Ingredients
Equipment
Method
- Place the pitted dates into a food processor and pulse until finely chopped and slightly sticky, about 30 seconds. The mixture should clump when pinched; add a tiny splash of water and pulse again if needed.
- Add the toasted oats, nut butter, honey, vanilla extract, and a pinch of salt to the processor. Blend until the mixture is well combined, sticky, and holds together when pressed, about 20-30 seconds.
- Scrape the mixture into a mixing bowl. Using a small scoop or your hands, portion out about 1-2 tablespoon-sized pieces. Roll each piece between your palms to form a smooth, round ball, pressing firmly to ensure they stick together.
- Place each energy ball onto a parchment-lined baking sheet, spacing them about 2 inches apart. For a firmer texture, refrigerate the balls for at least 30 minutes to set.
- Optional: Roll the chilled energy balls in shredded coconut, chopped nuts, or cocoa powder for extra flavor and visual appeal. Gently press the coating onto each ball to help it adhere.
- Transfer the finished energy balls to an airtight container. Keep refrigerated for up to a week or freeze for up to a month. Serve straight from the fridge or at room temperature for a soft, chewy treat.
Pro tips for perfect energy balls
- Bolded Mini-Head: Use slightly toasted oats for a nuttier flavor and crunch in every bite.
- Bolded Mini-Head: Chill the mixture for 15 minutes before shaping to prevent sticking and improve firmness.
- Bolded Mini-Head: Add a teaspoon of water if the mixture is too crumbly—moisture helps it come together.
- Bolded Mini-Head: Roll the balls firmly between your palms to ensure they hold shape during storage.
- Bolded Mini-Head: Coat the energy bites in shredded coconut or cacao powder to add texture and flavor contrast.
- Bolded Mini-Head: Store in an airtight container in the fridge for up to a week, or freeze for longer freshness.
- Bolded Mini-Head: For a smoother texture, warm the nut butter slightly before mixing, but avoid hot liquids to prevent separation.
Common mistakes and how to fix them
- MISSED to measure ingredients precisely? Use a standard measuring spoon or scale for accuracy.
- DUMPED too many ingredients at once? Add gradually, checking the mixture’s consistency as you go.
- OVER-TORCHED the mixture? Reduce heat or processing time, and add a splash of water if too dry.
- FORGOT to chill the balls? Refrigerate for at least 30 minutes to set properly and prevent crumbling.
Quick fixes and pantry swaps
- When mixture feels too dry, splash in a few drops of water and pulse briefly.
- If balls don’t hold, chill the mixture for 15 minutes before shaping.
- Splash some oil on sticky hands to make rolling easier.
- DUMPED too many ingredients? Adjust with a tiny bit more nut butter or honey.
- Splash cold water on your hands for a quick, five-second rescue when rolling gets sticky.
Prep, store, and reheat tips
- Prepare the mixture ahead by pulsing dates and blending ingredients; keep it in an airtight container in the fridge for up to 24 hours—sensory note: it firms slightly and becomes easier to shape.
- Form the energy balls and store them on a parchment-lined tray; refrigerate for up to 3 days or freeze for up to a month—note the firm texture and fresh aroma when ready to eat.
- Refrigerated energy balls are best consumed within a week; let them sit at room temperature for 5-10 minutes before serving for optimal chewiness.
- For reheating, briefly warm in the microwave (10-15 seconds) until just soft and fragrant—watch for melting or over-softening, which can make handling tricky.
Top questions about energy balls
1. How do I make sure my energy balls don’t fall apart?
Use dates that are soft and sticky for easier blending and better texture. Chilling the mixture helps it hold together better.
2. What’s the secret to perfectly round energy balls?
Keep the mixture cold and firm before shaping. Using slightly toasted oats adds crunch and flavor. Don’t overmix, or they turn too dense.
3. My mixture is too dry, what can I do?
Add a splash of water or extra nut butter if the mixture feels too crumbly. Refrigerate for at least 30 minutes to help set the shape.
4. How long should I refrigerate my energy balls?
Chill the formed balls in the fridge for at least 30 minutes. This helps them firm up and makes them easier to handle.
5. Can I use a different sweetener?
You can swap honey with maple syrup or agave, which will slightly change the flavor but keep them sweet and sticky.
6. What nut butter can I use instead of peanut butter?
Yes, you can substitute almond or cashew butter for peanut butter. They add a different nutty flavor and smooth texture.
7. What add-ins can I include?
Dried cranberries, shredded coconut, or mini chocolate chips work well. Just don’t overload so they stay easy to roll.
8. How should I store my energy balls?
Store energy balls in an airtight container in the fridge for up to a week or freeze for up to a month. Thaw slightly before eating.
9. My balls are sticky or too hard, how do I fix that?
If they feel too sticky to roll, dust your hands with a little oats or oil. If they’re too firm, warm slightly before shaping.
10. What if my mixture is too wet or too dry?
When mixture feels too dry, add a tiny splash of water or nut butter. For overly soft mixture, refrigerate for 15 minutes to firm up.
These energy bites are a little pocket of nostalgia wrapped in a no-fuss recipe. They remind me of childhood afternoons, simple and sweet, but with a modern twist for busy days. There’s a comfort in their chewiness and the familiar aroma of honey and oats, especially when you need a quick pick-me-up.
They’re imperfect, honest, and versatile—perfect for sneaking into lunchboxes or stashing in your bag. Making them is almost meditative, a small act of kindness for yourself amid chaos. In the end, it’s about those honest, homey flavors that stay with you long after the last bite.

Hi, I’m Madison Lane, the cook, recipe creator, and heart behind this kitchen. Food has been part of my life for as long as I can remember. Some of my earliest memories are of standing beside my dad while he cooked, watching him move comfortably around the kitchen, tasting sauces, and explaining why patience mattered just as much as seasoning.
