Mornings can be chaotic, and grabbing something quick yet satisfying is often a challenge. These no-bake granola bars became my go-to because they’re flexible and forgiving, using whatever nuts, seeds, and dried fruits I have on hand. Plus, there’s a comforting satisfaction in making something homemade that doesn’t require turning on the oven.
They’re perfect for those days when I want a snack that’s nourishing but doesn’t demand loads of prep or clean-up. The smell of toasted oats and honey, along with the chewy texture, reminds me that sometimes, simplicity really is best. It’s about reclaiming those rushed moments with a little homemade magic that’s always ready in the fridge.
This recipe is inspired by the chaos of hurried mornings and the need for a quick, wholesome snack that I can whip up with whatever’s in the pantry. It’s about reclaiming those moments when I want something satisfying without the fuss of baking, yet still crave a homemade touch that feels like a small victory.
The story behind this recipe
- This recipe came together during a lazy weekend when I realized I had a drawer full of leftover nuts, dried fruits, and a jar of honey that was about to expire. I wanted something simple, no fuss, that could satisfy my sweet tooth without turning on the oven. The first batch was a happy accident—crisp edges, chewy center, and the aroma of toasted oats filled the kitchen, making me smile.
- I started making these bars whenever I needed a quick, wholesome snack for busy mornings or a last-minute treat for friends. Over time, I tweaked the ingredients, adding a pinch of sea salt or swapping dried cranberries for apricots, but the core idea stayed the same: easy, adaptable, and homemade. They remind me that sometimes, the best recipes are born out of necessity and a bit of improvisation.
- heading
- story_type
Ingredient breakdown: key components
- Rolled oats: I love the nutty aroma they develop when toasted, but you can swap in quick oats for a softer bite.
- Honey: It’s the sticky glue that holds everything together, adding a natural sweetness. Maple syrup works well if you want a subtle flavor shift.
- Nuts and seeds: I prefer a crunchy mix, but chopped dried fruits can add chewy bursts. Toast them lightly for extra flavor.
- Dried fruit: I like cranberries or apricots, but chopped dates or figs give a rich, caramel-like sweetness. Keep them chopped small to distribute evenly.
- Butter or coconut oil: I use butter for richness, but coconut oil keeps it dairy-free and adds a subtle coconut scent. Melt it thoroughly for smooth mixing.
- Vanilla extract: Just a splash enhances the flavor, but a pinch of cinnamon can give a warm, cozy note. Adjust to your mood.
- Salt: A tiny pinch balances sweetness and enhances all other flavors. Don’t skip it, even if you’re watching your salt intake.
Spotlight on key ingredients
Rolled oats and Honey:
- Rolled oats: I love how they become slightly nutty and chewy after toasting, but quick oats give a softer texture.
- Honey: It acts as a sticky binder and sweetener, developing a caramel aroma when heated. Maple syrup offers a subtler sweetness.
Notes for ingredient swaps
- Sweetener: Maple syrup can replace honey for a slightly different, more caramel-like sweetness, and it’s vegan-friendly.
- Nuts and Seeds: Chopped almonds or walnuts work well, but sunflower seeds give a milder, nutty flavor without overpowering.
- Dried Fruit: Chopped dried apricots or cranberries add tartness and chewiness, but chopped dates give a richer, caramel-like taste.
- Butter or Oil: Coconut oil keeps these bars dairy-free and adds a subtle coconut aroma, but melted butter gives a richer, more traditional flavor.
- Binders: Agave syrup can replace honey for a similar sticky consistency, with a hint of a more neutral sweetness.
- Add-ins: Chia seeds or flaxseed meal can boost nutrition, but they might make the bars slightly more crumbly if added in excess.
- Additional Flavor: A pinch of cinnamon or nutmeg can warm up the flavor profile without changing the texture much.
Equipment & Tools
- Parchment-lined pan: To shape and hold the bars while setting
- Mixing bowl: To combine ingredients evenly
- Spatula: To mix and press the mixture
- Microwave-safe bowl: To melt honey and butter quickly
Step-by-step guide to no bake bars
- Equipment & Tools: line a 20cm (8-inch) square pan with parchment paper, a mixing bowl, a spatula, and a microwave-safe bowl for melting.
- Measure 2 cups rolled oats and toast them in a dry skillet over medium heat for 3-4 minutes until golden and fragrant, stirring frequently. Let cool slightly.
- In the microwave-safe bowl, melt 1/2 cup honey and 1/4 cup butter (or coconut oil) together on high for 30 seconds, then stir until smooth. Add 1 tsp vanilla and a pinch of salt.
- Pour the warm honey mixture over the toasted oats in the mixing bowl. Add 1/2 cup chopped nuts and 1/2 cup dried fruit of your choice. Mix thoroughly with the spatula until everything is evenly coated.
- Transfer the mixture into the prepared pan. Press down firmly with the back of the spatula or a piece of parchment to create an even, compact layer. Chill in the fridge for 2 hours or until set.
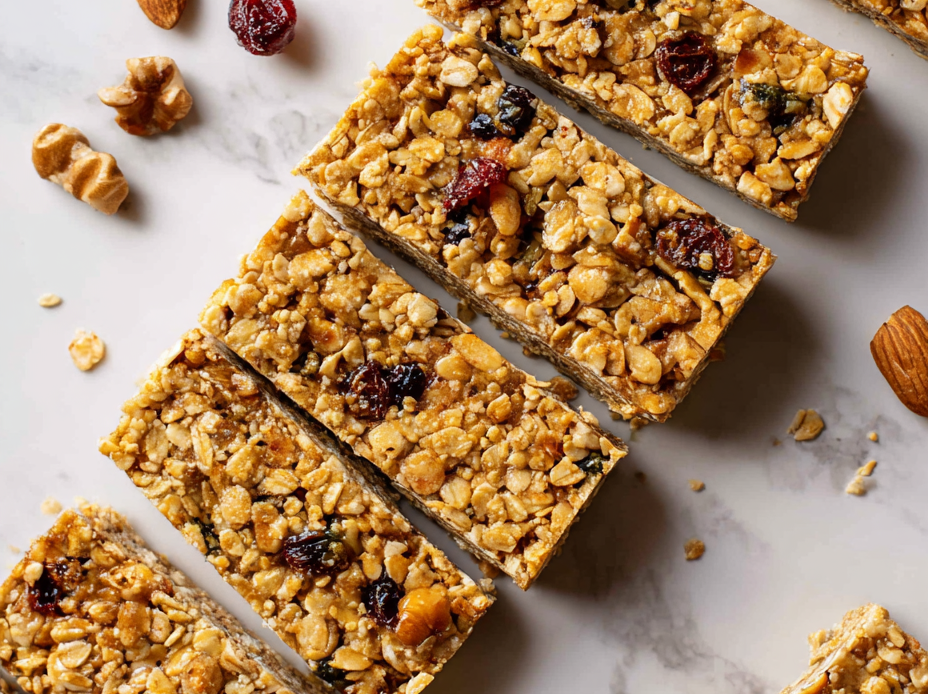
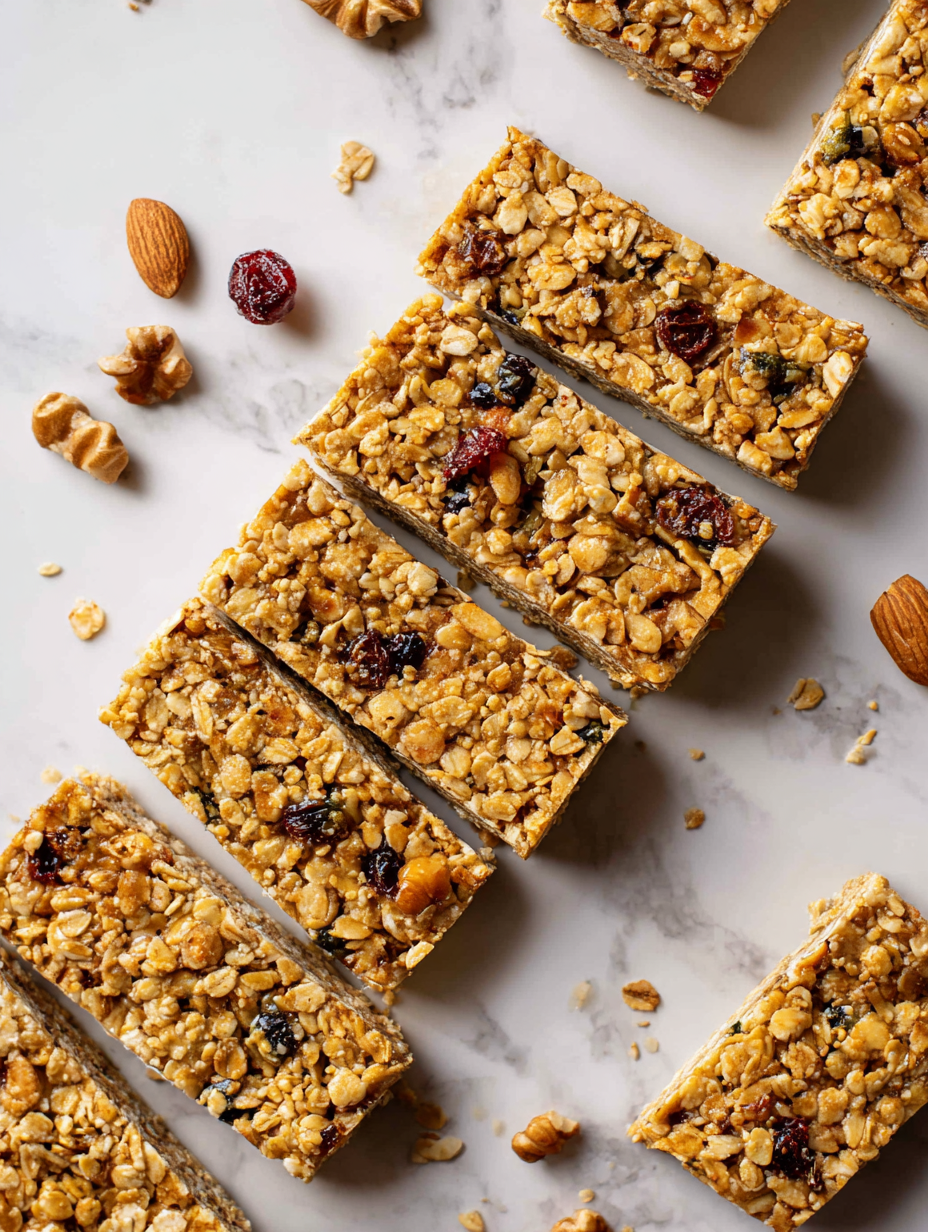
- Once firm, lift the slab out of the pan using the parchment edges. Slice into bars or squares with a sharp knife. Store in an airtight container in the fridge for up to a week.
- Optional: For extra crunch, sprinkle a few more chopped nuts on top before chilling. For softer bars, briefly microwave before serving.
Chill the assembled mixture in the fridge for at least 2 hours until set. Slice into bars and store in an airtight container in the fridge, where they’ll stay fresh for up to a week.
How to Know It’s Done
- The mixture should be sticky and hold together when pressed.
- Oats should be toasted golden and fragrant, not burnt.
- Bars will feel firm but slightly chewy when properly chilled.
No-Bake Granola Bars
Ingredients
Equipment
Method
- Line your 20cm (8-inch) square pan with parchment paper to prevent sticking.
- Toast the oats in a dry skillet over medium heat for 3-4 minutes, stirring constantly until they turn golden and smell nutty. Remove from heat and let cool slightly.
- In a microwave-safe bowl, melt the honey and butter together on high for about 30 seconds, then stir until smooth and bubbly. Add vanilla extract and a pinch of salt, mixing well.
- Pour the warm honey mixture over the toasted oats in the mixing bowl. Add the chopped nuts and dried fruit, then stir thoroughly with a spatula until everything is evenly coated and sticky.
- Transfer the mixture into the prepared pan. Press down firmly with the back of a spatula or a piece of parchment to create an even, compact layer. This helps the bars hold together.
- Place the pan in the fridge and chill for at least 2 hours, or until the mixture is firm and set.
- Once set, lift the slab out of the pan using the parchment paper and place on a cutting board. Slice into 12 bars or squares using a sharp knife dipped in hot water for clean cuts.
- Store the bars in an airtight container in the fridge for up to a week, or wrap individually and freeze for longer storage.
Pro tips for perfect bars
- Bolded mini-head: Use a light hand when pressing the mixture into the pan to avoid overly compact bars.
- Bolded mini-head: Toast oats until fragrant and golden—this brings out a deep, nutty aroma that defines the bars.
- Bolded mini-head: Melt honey with butter until smooth and slightly bubbly—this ensures a sticky, cohesive mixture.
- Bolded mini-head: Press firmly and evenly—use the bottom of a glass or spatula to achieve a compact, uniform layer.
- Bolded mini-head: Chill until set—give it at least 2 hours in the fridge for perfect hold and chewiness.
- Bolded mini-head: Cut with a sharp, warm knife—dip blade in hot water for clean, smooth edges without cracks.
- Bolded mini-head: Store in an airtight container—keeps bars fresh and chewy, avoiding that stale or crumbly texture.
Common mistakes and how to fix them
- FORGOT to evenly press mixture → Use the back of a spatula for firm packing.
- DUMPED mixture too hot → Wait until it cools slightly before pressing into pan.
- OVER-TORCHED oats → Toast oats over medium heat, stirring constantly, until golden, not burnt.
- MISSED chilling time → Chill for at least 2 hours for proper set and firm texture.
Quick fixes and pantry swaps
- When mixture is too dry → Splash in a tiny bit more honey or melted butter.
- If bars crumble when cutting → Patch with a dab of warm honey and press gently.
- Dumped mixture too hot → Shield with a damp cloth and wait 5 minutes before pressing.
- Over-toasted oats → Swap to lightly toasted oats and reduce heat next time.
- When bars lack chewiness → Freeze for 10 minutes before slicing for firmer texture.
Prep and storage tips
- Prepare the mixture the night before to let flavors meld and make assembly quicker in the morning.
- Store the cut bars in an airtight container in the fridge for up to a week; they’ll stay chewy and fresh.
- For longer storage, wrap bars individually in parchment and freeze for up to a month; thaw at room temperature.
- Refrigerated bars may firm up; gently warm in the microwave for 10-15 seconds until soft and fragrant with oats.
- The flavor intensifies slightly after a day or two in the fridge, with a richer, more cohesive taste and aroma.
Top questions about no bake granola bars
1. Why are my bars falling apart?
Use a sticky binder like honey or maple syrup to hold the bars together. If it’s too crumbly, add a bit more melted honey and press firmly.
2. How do I get clean cuts?
Chill the mixture in the fridge for at least 2 hours until it’s firm enough to cut cleanly. Use a sharp knife dipped in hot water for smooth slices.
3. Can I substitute honey?
You can swap honey for maple syrup or agave syrup for different flavors. Keep in mind, these might change the texture slightly.
4. Can I use quick oats?
Yes, you can use quick oats instead of rolled oats for a softer, more tender bar. Toast them lightly for extra flavor.
5. How long do they last?
Store bars in an airtight container in the fridge for up to a week. For longer storage, wrap individually and freeze for up to a month.
6. Can I add dried fruit?
Add chopped dried fruit for chewy bursts of flavor. Soaking dried fruit in warm water for a few minutes helps soften it before mixing.
7. How do I toast oats properly?
Ensure the oats are toasted until fragrant and golden. Over-toasting can taste burnt and ruin the flavor, so keep a close eye.
8. How do I get them to stick together?
Mix ingredients thoroughly so the oats and nuts are evenly coated. Pressing firmly into the pan helps prevent crumbling after chilling.
9. My mixture is too dry or sticky?
When mixture is too dry, add a splash of honey or melted butter. If it’s too sticky, sprinkle in a bit more oats and mix again.
10. How can I customize texture?
If you want extra crunch, sprinkle chopped nuts on top before chilling. For softer bars, microwave briefly before serving.
Making these no-bake granola bars is like capturing a little bit of chaos and turning it into something tangible. Each batch is a reminder that simple ingredients, a bit of patience, and a splash of creativity can bring a moment of calm and satisfaction to a hectic day.
They’re not just snack bars—they’re small acts of homemade rebellion, a way to reclaim your time and your pantry. In a world that’s constantly rushing, these bars offer a quiet, chewy reward that’s worth every messy step.

Hi, I’m Madison Lane, the cook, recipe creator, and heart behind this kitchen. Food has been part of my life for as long as I can remember. Some of my earliest memories are of standing beside my dad while he cooked, watching him move comfortably around the kitchen, tasting sauces, and explaining why patience mattered just as much as seasoning.
