
This no bake oatmeal cookies recipe is my go-to when I’m staring at an empty pantry but craving something sweet and satisfying. It’s honestly a bit of kitchen chaos—measuring out what I can, melting chocolate in the microwave, and hoping it all comes together without a fuss. The best part? No oven needed, just a quick mix and a little patience to let them set.
These cookies are a nostalgic throwback to childhood afternoons, but they’re also a practical fix for busy days or last-minute cravings. I love how flexible they are—substituting peanut butter for a different nutty note, or tossing in a handful of chocolate chips for extra richness. It’s about making do with what you have, turning simple ingredients into a little moment of comfort.
This recipe is my secret weapon for when the pantry’s looking bare but I crave something sweet and nostalgic. It’s about using what’s on hand, no fancy ingredients needed, just honest kitchen improvisation that brings a little chaos and a lot of comfort.
Imperfectly Perfect Comfort Food
- These cookies remind me of lazy afternoons with my grandma, the smell of oats and chocolate filling the kitchen.
- I love how forgiving this recipe is—sometimes I toss in a handful of walnuts or a dash of sea salt just because I can.
- Baking isn’t always my thing, but these no-bake treats make me feel like a kitchen wizard, no oven required.
Imperfectly Perfect Comfort Food
This recipe took shape during a chaotic weekend when I was out of the usual baking supplies but needed a quick fix for a sweet craving. I remembered how my grandma used to make something similar with whatever was around—no fuss, just love and a bit of kitchen improvisation. That memory stuck with me, and now it’s my go-to for a no-fuss, comforting treat that doesn’t demand much effort or ingredients. It’s one of those recipes that feels like a little secret, just a simple reminder that good things can come from what you already have on hand.
Historical & Cultural Notes
- These cookies likely originated during times of scarcity, where improvisation in the kitchen was essential for sweet treats.
- No bake recipes gained popularity during the mid-20th century as a practical way to make desserts without an oven, especially during wartime rationing.
- The combination of oats and chocolate became a nostalgic staple for many, symbolizing quick comfort and resourcefulness in home baking.
Ingredient breakdown: key components
- Old-fashioned rolled oats: I love how the oats give these cookies their chewy texture and nutty flavor. For a softer bite, try quick oats, but I prefer the hearty chew of rolled oats.
- Cocoa powder: I use unsweetened cocoa for that deep chocolate hit—makes the whole batch feel richer. If you want a milder taste, a touch of Dutch-processed cocoa works well, too.
- Sweetener (sugar or honey): I usually go with brown sugar for a hint of caramel, but honey adds a floral sweetness that’s less gritty. Adjust depending on how sweet you like it.
- Butter or coconut oil: I prefer butter for the full, creamy flavor and a slight salty note, but coconut oil keeps it dairy-free and adds a subtle tropical aroma. Melt it just enough to blend smoothly.
- Peanut butter: I always reach for natural, runny peanut butter—it helps everything stick together better and adds a rich, roasted essence. For a different twist, almond butter works, though it’s a bit milder.
- Vanilla extract: I swear a splash of vanilla brightens the whole batch, making the chocolate pop even more. Skip it if you want a more straightforward, rustic cookie.
- Optional add-ins (chocolate chips, nuts): I toss in a handful of semi-sweet chips or chopped walnuts—adds crunch and bursts of extra flavor. But honestly, these cookies are delicious plain, too.
Spotlight on key ingredients
Old-fashioned rolled oats:
- I love how the oats give these cookies their chewy texture and nutty flavor. For a softer bite, try quick oats, but I prefer the hearty chew of rolled oats.
- Cocoa powder: I use unsweetened cocoa for that deep chocolate hit—makes the whole batch feel richer. If you want a milder taste, a touch of Dutch-processed cocoa works well, too.
Peanut butter:
- I swear a splash of vanilla brightens the whole batch, making the chocolate pop even more. Skip it if you want a more straightforward, rustic cookie.
- Sweetener (sugar or honey): I usually go with brown sugar for a hint of caramel, but honey adds a floral sweetness that’s less gritty. Adjust depending on how sweet you like it.
Notes for ingredient swaps
- Dairy-Free: Swap butter for coconut oil. It melts smoothly and adds a subtle tropical aroma, though it may slightly alter the richness.
- Sweetener: Use honey or maple syrup instead of sugar. They bring a different depth of sweetness and a bit of moisture.
- Oats: Substitute quick oats for rolled oats for a softer, more tender cookie texture. Keep in mind it may change the chewiness.
- Peanut Butter: Almond butter or cashew butter can replace peanut butter. They add a different nutty flavor but might impact stickiness.
- Chocolate: Dark chocolate chips or chunks can be swapped for semi-sweet. They melt a little more and add a richer, more intense chocolate flavor.
- Add-ins: Chopped nuts, dried fruit, or coconut flakes can be mixed in. They bring extra texture and flavor but may alter the overall chew.
- Cocoa Powder: Dutch-processed cocoa for a smoother, less acidic flavor. If you prefer a brighter chocolate taste, stick with natural cocoa.
Equipment & Tools
- Medium saucepan: To melt and combine ingredients evenly.
- Mixing spoon: To stir the mixture thoroughly and prevent burning.
- Parchment paper: To prevent sticking and make cleanup easier.
- Baking sheet or flat surface: For setting the cookies as they cool and firm up.
Step-by-step guide to no bake cookies
- Gather your equipment: a medium saucepan, a mixing spoon, parchment paper, and a baking sheet or flat surface for setting the cookies.
- In the saucepan, combine 1 cup unsweetened cocoa powder, 1 cup granulated sugar, and 1/2 cup butter or coconut oil.
- Heat over medium, stirring constantly. Bring to a gentle boil around 2-3 minutes; you should see a slight crackle and smell the rich chocolate aroma. If it boils over, turn down the heat.
- Remove from heat and stir in 1 teaspoon vanilla extract and 1/2 cup peanut butter until smooth.
- Add 3 cups rolled oats (or quick oats for a softer texture), mixing thoroughly until everything is evenly coated and the oats look shiny and a bit sticky.
- Using a spoon, drop spoonfuls onto parchment paper, spacing them out. Flatten slightly if you like a more uniform shape.
- Let the cookies sit at room temperature for about 30 minutes to set, or refrigerate for 15 minutes if you’re in a hurry. They should be firm enough to handle without falling apart.
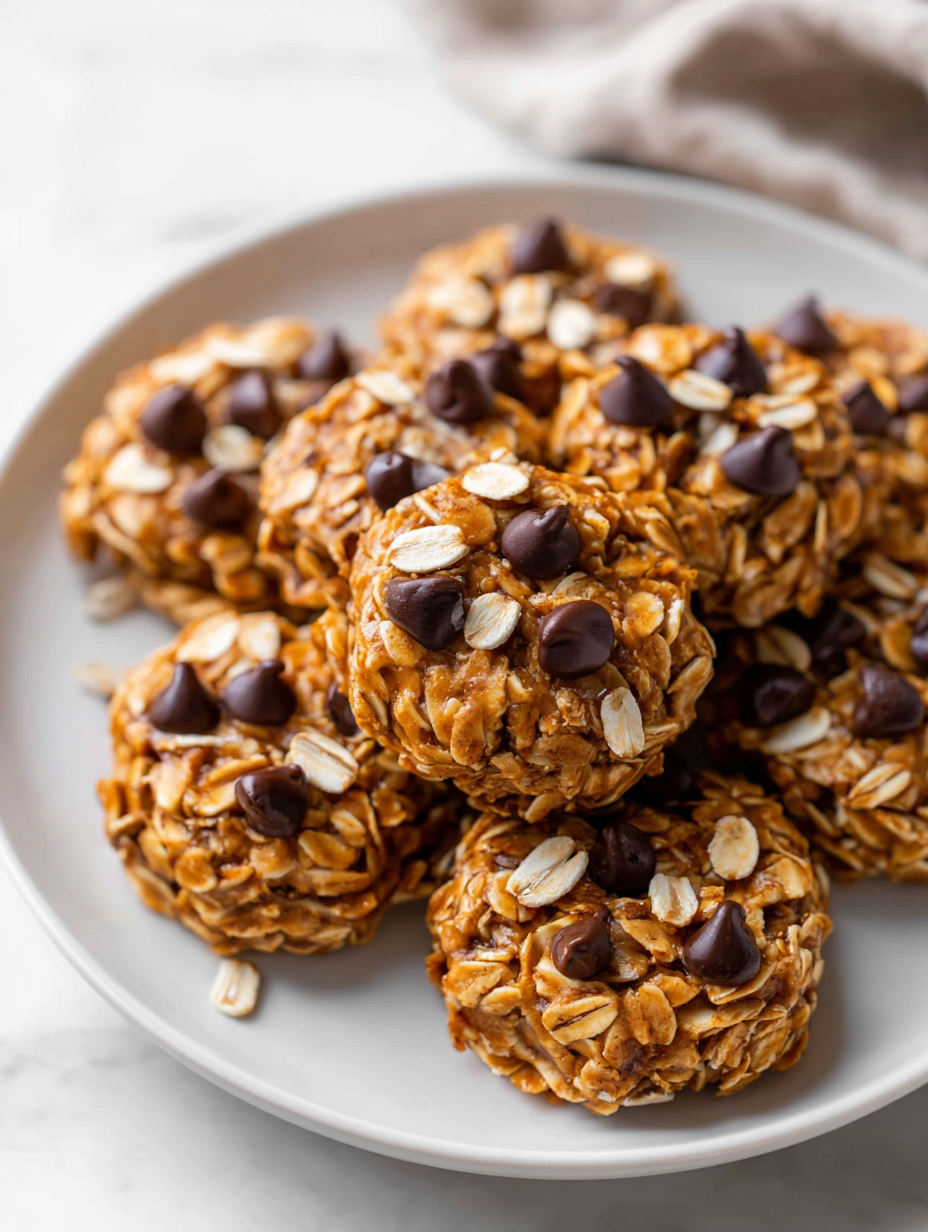
- Once set, gently peel off the parchment paper. The cookies should have a glossy, fudgy look with slightly cracked tops.
- Taste test: they should be chewy with a slight snap on the edges. If they’re sticky or too soft, give them a bit more time to firm up.
- Store in an airtight container at room temperature for up to 3 days, or in the fridge for a week. For longer storage, freeze and thaw at room temp before serving.
Allow cookies to rest at room temperature for 30 minutes or chill for 15 minutes until firm. Once set, gently peel from parchment and serve. Store in an airtight container, layering with parchment if stacking, to keep them fresh and chewy.
How to Know It’s Done
- Cookies are firm and shiny with a slight crack on top.
- They hold shape when dropped and aren’t sticky to the touch.
- Fudgy aroma fills the air, signaling proper cooking stage.
No-Bake Oatmeal Cookies
Ingredients
Equipment
Method
- Gather all your ingredients and set them within reach. Measure out the cocoa powder, sugar, and oats, and have the peanut butter, vanilla, and melted butter or coconut oil ready to go.
- In your medium saucepan, combine the cocoa powder, sugar, and melted butter or coconut oil. Turn the heat to medium and stir constantly as the mixture begins to bubble gently, releasing a rich chocolate aroma and turning shiny.
- Once the mixture is bubbling steadily and smooth, remove the saucepan from the heat. Stir in the vanilla extract and peanut butter until the mixture is glossy and well combined, with no lumps.
- Add the oats to the saucepan and fold them into the chocolate mixture, stirring thoroughly until all the oats are evenly coated and the mixture starts to look thick and sticky.
- Line a baking sheet with parchment paper. Using a spoon, scoop out spoonfuls of the mixture and drop them onto the parchment, spacing them apart for spreading.
- Gently press down on each spoonful to flatten slightly, creating a more uniform shape. Let the cookies sit at room temperature for about 30 minutes or refrigerate for 15 minutes until they are firm and glossy.
- Once the cookies are set and firm to the touch, peel them carefully from the parchment paper. They should be chewy with a fudgy, shiny surface and slightly cracked tops.
- Enjoy these nostalgic, no-bake treats as a quick, satisfying dessert. Store leftovers in an airtight container at room temperature for up to 3 days or in the fridge for longer freshness.
Pro tips for perfect cookies
- Bolded mini-head: Use room temperature ingredients → Ensures smooth melting and even texture.
- Bolded mini-head: Stir constantly during melting → Prevents cocoa from burning and lumps forming.
- Bolded mini-head: Drop cookies onto parchment → Keeps them from sticking and makes cleanup easier.
- Bolded mini-head: Flatten slightly before setting → Achieves more uniform shape and quicker setting.
- Bolded mini-head: Let cookies rest for at least 30 minutes → Develops chewy texture and flavor.
- Bolded mini-head: Chill for quicker firming → Refrigerate for 10-15 minutes if in a hurry, watch for shine to fade.
- Bolded mini-head: Use a gentle heat to avoid overcooking → Keep heat at medium, and remove from stove as soon as mixture crackles.
Common mistakes and how to fix them
- FORGOT to stir continuously → Stir thoroughly to prevent burning or cocoa lumps.
- DUMPED mixture too quickly → Drop spoonfuls gently to avoid spreading too flat.
- OVER-TORCHED the mixture → Remove from heat immediately if smell turns burnt or mixture darkens too much.
- MISSED setting time → Let cookies rest at least 30 minutes for proper firmness and chewiness.
Quick Fixes and Pantry Swaps
- When mixture is too thick → Splash in a bit of hot water and stir until smooth.
- If cookies are too sticky → Chill the mixture for 10 minutes to firm up.
- Splash melted chocolate with a pinch of sea salt → Enhances flavor and masks any bitterness.
- Patch cracked cookies with a tiny dab of warm chocolate → Reinforces shape and adds shiny finish.
- Shield delicate cookies from humidity → Store in airtight container to prevent sogginess.
Prep, store, and reheat tips
- Cookies can be prepped a few hours ahead; just keep them covered at room temperature to maintain their chewy texture.
- Store in an airtight container at room temperature for up to 3 days, or in the fridge for about a week. Expect the flavors to deepen slightly over time.
- Refrigerate for longer shelf life; they will become firmer and more fudgy. Let them sit at room temp for 5 minutes before serving for optimal softness.
- To reheat or soften straight from the fridge, give the cookies a quick 10-second zap in the microwave. They’ll smell rich and chocolatey, with a slight chew.
- For best texture, avoid freezing unless you like them extra chewy; thaw at room temp for 10 minutes, and they’ll regain their fudgy bite.
Top questions about no bake oatmeal cookies
1. Can I use quick oats instead of rolled oats?
You can use quick oats if you prefer a softer, less chewy texture. They absorb flavors faster and make the cookies a bit more tender.
2. Can I substitute honey or syrup for sugar?
Yes, you can swap honey or maple syrup for sugar. They add moisture and a different floral or caramel note, but may make the mixture slightly softer.
3. Can I use almond or cashew butter instead of peanut butter?
Absolutely. Almond or cashew butter works well, but expect a milder nutty flavor and slightly different texture—less sticky than peanut butter.
4. Can I customize the add-ins?
Yes, you can omit chocolate chips or add dried fruits like cranberries or raisins for extra bursts of flavor and texture.
5. How should I store these cookies?
Storing at room temp in an airtight container keeps them chewy for about 3 days. For longer storage, refrigerate for up to a week or freeze for up to a month.
6. What if my cookies are too soft or dry?
If they feel too soft after setting, chill them in the fridge for 10-15 minutes. If they’re too dry, add a tiny bit more peanut butter or a drop of water and stir well.
7. How do I know when the mixture is ready?
Use a gentle medium heat to melt ingredients, stirring constantly. If mixture crackles and smells rich and chocolatey, it’s ready to set.
8. Can I prepare the mixture ahead?
Yes, you can make the mixture ahead of time and keep it in the fridge for a few hours before scooping. Just give it a quick stir first.
9. Any quick finishing touches?
Add a pinch of sea salt on top before setting for a flavor boost or drizzle with melted chocolate after they firm up for extra richness.
10. What if the mixture is too thick or runny?
If mixture is too thick, splash in a little hot water or milk to loosen it. If it’s too runny, chill it briefly in the fridge.
These cookies are a reminder that sometimes simplicity has the most charm. They’re perfect for those moments when you need a quick, satisfying treat without fuss or special ingredients.
In the end, it’s about the small victories—melting chocolate, the smell of oats, and that first bite of chewy, chocolatey goodness. Sometimes, the easiest recipes turn out to be the most memorable.

Hi, I’m Madison Lane, the cook, recipe creator, and heart behind this kitchen. Food has been part of my life for as long as I can remember. Some of my earliest memories are of standing beside my dad while he cooked, watching him move comfortably around the kitchen, tasting sauces, and explaining why patience mattered just as much as seasoning.
