These no-bake peanut oat bars are my secret weapon on hectic mornings. They come together fast, with just a handful of ingredients, and somehow manage to feel like a treat from childhood—crunchy, sweet, and a little salty all at once. It’s the kind of snack that makes you feel like you’re sneaking a cookie, even if it’s just oats and peanut butter.
What I love most is how honest they are. No fancy gadgets, no oven heat, just a bowl, a spoon, and a little patience as everything sets. They’re perfect for grabbing on the go, whether you’re rushing out the door or just need a quick, satisfying bite between meetings. Plus, the smell of roasted peanut and honey filling the kitchen never gets old.
Focusing on how these bars became my go-to for quick, honest snacks during busy mornings, highlighting their simplicity and the nostalgia of childhood treats.
The story behind this recipe
This recipe came together one lazy afternoon when I was rummaging through my pantry, craving something sweet and hearty without the fuss of baking. I remembered those childhood peanut butter bars my mom used to make, but I wanted something more portable and less messy. The idea of sticking oats, peanut butter, and honey into a tray just stuck with me, and I started tweaking until I got the perfect chewy, crunchy bite.
Ingredient breakdown: key components
- Peanut butter: I prefer creamy, smooth peanut butter for easy mixing, but crunchy adds a nice texture—try what feels best for your bite.
- Oats: Old-fashioned rolled oats give the bars that chewy bite I love. Quick oats tend to be too soft and lose their integrity quickly.
- Honey: I love how honey adds a glossy, sticky sweetness that really ties everything together. Use maple syrup if you want a different flavor punch.
- Dark chocolate: Chopped dark chocolate or chips melt into the mixture, offering a rich, slightly bitter contrast—skip if you want it dairy-free.
- Salt: Just a pinch of sea salt enhances all those nutty, sweet flavors and keeps the bars from tasting flat—don’t skip this step.
- Vanilla extract: A splash of vanilla adds warmth and depth, making the flavors pop—consider almond extract for a twist.
- Optional add-ins: Dried cranberries or chopped nuts give extra crunch and flavor—feel free to customize based on what you have in the pantry.
Spotlight on key ingredients
Peanut Butter:
- I prefer creamy, smooth peanut butter for easy mixing, but crunchy adds a nice texture—try what feels best for your bite.
- Oats: Old-fashioned rolled oats give the bars that chewy bite I love. Quick oats tend to be too soft and lose their integrity quickly.
- Honey: I love how honey adds a glossy, sticky sweetness that really ties everything together. Use maple syrup if you want a different flavor punch.
Dark Chocolate & Flavourings:
- Dark chocolate: Chopped dark chocolate or chips melt into the mixture, offering a rich, slightly bitter contrast—skip if you want it dairy-free.
- Salt: Just a pinch of sea salt enhances all those nutty, sweet flavors and keeps the bars from tasting flat—don’t skip this step.
- Vanilla extract: A splash of vanilla adds warmth and depth, making the flavors pop—consider almond extract for a twist.
Notes for ingredient swaps
- Nut Butter: Almond or cashew butter can replace peanut butter, offering a different flavor but similar creaminess. Watch the salt content, though, as some nut butters are saltier.**
- Sweetener: Maple syrup or agave nectar can substitute honey for a vegan or different-flavored option. They may alter the stickiness slightly, so adjust quantity accordingly.**
- Oats: Use gluten-free rolled oats if needed. Steel-cut oats are too hard and won’t give the right texture—stick with traditional rolled oats for chewiness.**
- Chocolate: Carob chips or dairy-free chocolate chunks work well if you’re dairy-free or want a different flavor profile—expect a slightly different melt and bitterness.**
- Add-ins: Dried cranberries, chopped nuts, or coconut flakes can be swapped in for variety. Keep in mind moisture content, which can affect how well the bars set.**
- Salt: Sea salt can be replaced with Himalayan pink salt or omitted entirely if you prefer a less salty bite—taste as you go.**
- Vanilla: Almond or coconut extract can replace vanilla for a different aromatic note—use sparingly, as they are more potent.
Equipment & Tools
- 20x20cm (8×8 inch) square pan: Holds the mixture and helps shape the bars.
- Mixing bowl: Combine and stir ingredients.
- Spatula: Press mixture into the pan and spread chocolate.
- Parchment paper: Prevents sticking and makes removal easy.
- Microwave or double boiler: Melt chocolate smoothly.
- Sharp knife: Slice into bars neatly.
Step-by-step guide to no bake bars
- Gather all your equipment: a 20x20cm (8×8 inch) square pan, a mixing bowl, a spatula, and parchment paper. Line the pan with parchment for easy removal.
- In your mixing bowl, combine 1.5 cups (150g) rolled oats, 0.5 cups (125g) peanut butter, 0.25 cups (80g) honey, and 1 teaspoon vanilla extract. Stir until well mixed and the oats are coated.
- Melt 0.5 cups (90g) dark chocolate chips in a microwave-safe bowl in 30-second bursts, stirring in between until smooth. Alternatively, melt over a double boiler on low heat. Set aside to cool slightly.
- Pour the chocolate into the oat mixture, folding gently until evenly distributed. The mixture should be sticky but manageable. If too dry, add a teaspoon of honey or peanut butter; if too wet, add a bit more oats.
- Transfer the mixture into your prepared pan. Use the spatula to press it firmly into an even layer, about 1 inch thick. Press down well to ensure the bars hold together.
- Pour the melted chocolate over the pressed mixture. Spread it evenly with the spatula, covering all the surface. For a prettier finish, sprinkle a few extra oats or chopped nuts on top if desired.
- Place the pan in the fridge for at least 2 hours, or until the chocolate is set and the bars are firm to the touch. This helps everything bind together nicely.
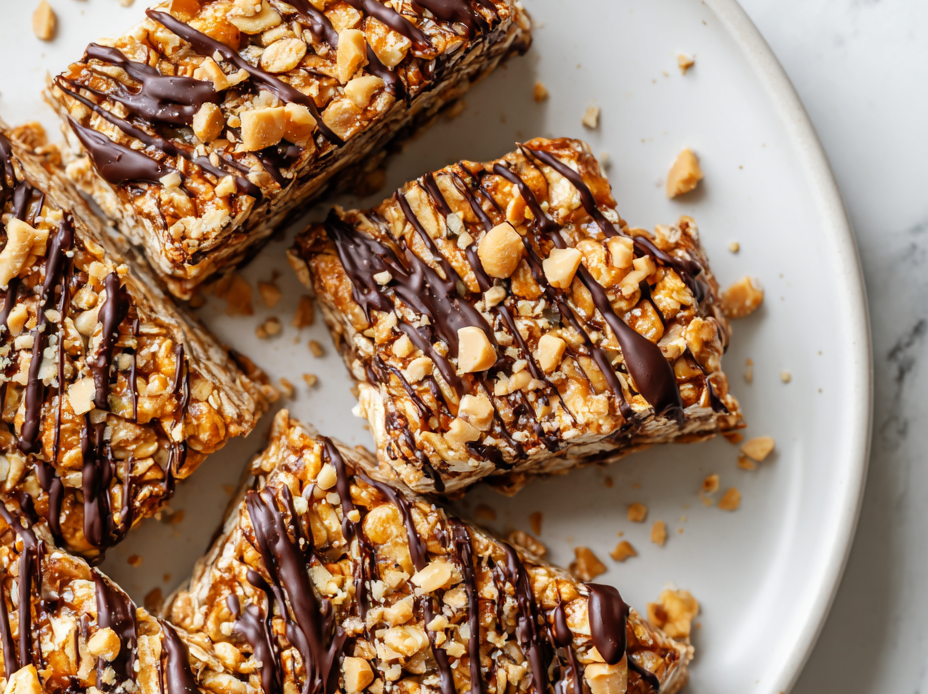
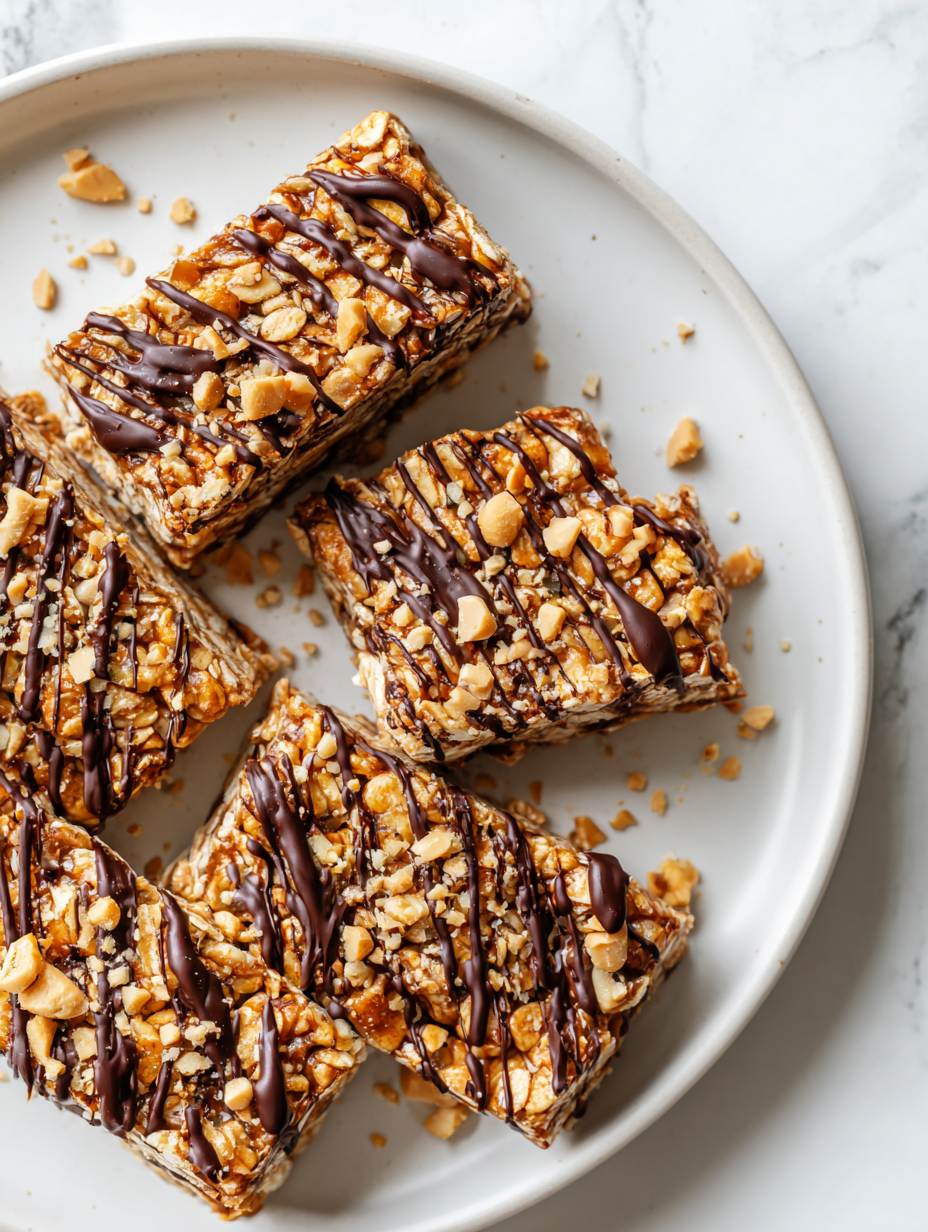
- Once chilled, lift the entire block out of the pan using the parchment paper. Slice into 8-10 bars with a sharp knife. They should be chewy, with a glossy chocolate top and a nutty aroma.
Chill the bars in the fridge until firm, at least 2 hours. Slice with a sharp knife, then serve directly from the fridge or at room temperature. Keep leftovers in an airtight container in the fridge for up to a week.
How to Know It’s Done
- Chocolate is fully melted and glossy.
- Bars feel firm and hold shape when sliced.
- Oat mixture is evenly pressed, no crumbles.
No-Bake Peanut Oat Bars
Ingredients
Equipment
Method
- Line your square pan with parchment paper, leaving overhang for easy removal.
- In a large mixing bowl, combine the rolled oats and sea salt, then give them a quick stir to distribute evenly.
- Add the peanut butter, honey, and vanilla extract to the bowl, then stir everything together until the mixture becomes thick, sticky, and well coated—the oats should feel slightly sticky but manageable.
- Melt the dark chocolate chips in a microwave-safe bowl in 30-second bursts, stirring well in between, until smooth and glossy. Let it cool slightly.
- Pour the melted chocolate into the oat mixture and fold gently with a spatula until the chocolate is evenly distributed and the mixture is uniformly coated with a glossy sheen.
- Transfer the mixture into your prepared pan. Use the back of the spatula or a pressing tool to evenly press and compact the mixture into the pan, about 1 inch thick, ensuring there are no air pockets.
- Spread the remaining melted chocolate over the pressed mixture, smoothing it out with the spatula for a glossy, even top. Sprinkle extra oats or chopped nuts on top if desired.
- Place the pan in the fridge and chill for at least 2 hours, or until the chocolate is fully set and the bars are firm to the touch.
- Once chilled, lift the entire block out of the pan using the parchment overhang. Place on a cutting board and slice into 8-10 bars with a sharp knife dipped in hot water for clean cuts.
- Serve immediately or store the bars in an airtight container in the fridge for up to a week. For longer storage, wrap tightly and freeze for up to 3 months.
Tips for perfect no-bake bars
- Use room temperature peanut butter for easier mixing and a smoother texture.
- Toast the oats lightly in a dry pan before mixing to enhance their nutty aroma.
- Microwave chocolate chips in short bursts, stirring often, to prevent burning and ensure smooth melting.
- Press the mixture firmly into the pan with the back of a spatula or glass to avoid air pockets and ensure clean cuts.
- Chill the bars in the fridge for at least 2 hours until the chocolate is set and the bars hold together firmly.
- When slicing, use a warm knife dipped in hot water for clean, even cuts without crumbling.
- Store leftovers in an airtight container in the fridge to keep them chewy and fresh for up to a week.
Common mistakes and how to fix them
- FORGOT to evenly press the mixture → Use a firm spatula or glass to press firmly.
- DUMPED too much chocolate → Add chocolate gradually, folding gently for even distribution.
- OVER-TORCHED chocolate → Melt in short bursts, stir well, and remove before burning smell appears.
- MISSED chill time → Chill at least 2 hours until bars are firm and chocolate is set.
Quick fixes and pantry swaps
- When mixture is too dry → Splash in a teaspoon of water or milk for better binding.
- If bars don’t set → Patch with a bit more honey and chill longer, at least 2 hours.
- DUMPED too much chocolate → Shield the mixture from overheating by melting in short bursts.
- Over-torched chocolate → Rescue with a spoonful of coconut oil or butter to restore gloss and smoothness.
- When in doubt → Swap dark chocolate for chocolate chips or chunks for easier melting and texture.
Prep, store, and reheat tips
- You can prep the entire mixture a day ahead. Just keep it in an airtight container in the fridge; the flavors meld and intensify overnight, making for a richer, nuttier bite.
- Store the sliced bars in an airtight container at room temperature for up to 3 days, or in the fridge for up to a week. The fridge keeps them firm and chewy, but they may lose a bit of their soft, sticky charm over time.
- Reheat slightly in the microwave for 10 seconds if you prefer softer bars. The chocolate will melt just enough to bring back that glossy, inviting shine and aroma of roasted peanut.
- For longer storage, freeze bars wrapped tightly in plastic wrap and then in foil. They keep well for up to 3 months, and you’ll notice the crunch and peanut aroma intensify once thawed.
- Let frozen bars sit at room temperature for 10–15 minutes before serving. The texture will soften and the smell of honey and peanut butter will be more pronounced.
Top questions about peanut oat bars
1. Can I use a different sweetener?
Yes, you can swap honey for maple syrup or agave nectar, but expect a slightly different sticky texture and sweetness level.
2. Can I substitute the peanut butter?
Absolutely. Use natural peanut butter for a richer flavor or soy nut butter for nut allergies. Creamy works best for smooth bars.
3. Can I omit the chocolate?
Yes, melted dark chocolate melts into the mixture, creating a glossy, rich topping—skip if dairy-free or prefer less chocolate.
4. How long do these last?
Store bars in an airtight container at room temperature for up to 3 days or in the fridge for about a week.
5. How do I know when they’re done?
Chill the bars at least 2 hours until firm. You’ll know they’re ready when they hold shape and the chocolate looks set.
6. Can I use quick oats?
Use old-fashioned rolled oats for chewiness. Quick oats tend to be too soft and may turn mushy in the fridge.
7. Can I customize the add-ins?
Yes, you can add chopped nuts, dried cranberries, or coconut flakes for extra texture and flavor variations.
8. My mixture is too dry or wet, what do I do?
If the mixture feels too dry, stir in a teaspoon of water or honey. If too wet, add more oats or peanut butter.
9. How can I get clean slices?
For cleaner cuts, dip your knife in hot water and wipe it clean between slices for smooth, neat bars.
10. The bars won’t set right, what now?
If the bars aren’t setting properly, extend chilling time or add a little more melted chocolate on top for better firmness.
These bars are more than just a quick snack; they remind me of simpler mornings and the joy of unpolished, honest treats. Each bite carries a bit of nostalgia, with that satisfying crunch and the rich aroma of peanut and honey filling the kitchen. Sometimes, keeping things straightforward is exactly what you need to get through a busy day.
In the end, it’s these small, unpretentious recipes that stick with us—reminding us that good food doesn’t have to be complicated. They’re perfect for when you want something familiar, comforting, and made with love, no matter how hectic life gets.

Hi, I’m Madison Lane, the cook, recipe creator, and heart behind this kitchen. Food has been part of my life for as long as I can remember. Some of my earliest memories are of standing beside my dad while he cooked, watching him move comfortably around the kitchen, tasting sauces, and explaining why patience mattered just as much as seasoning.
