This no-bake ricotta cheesecake isn’t about perfection; it’s about the charm of something simple, creamy, and slightly rustic. I love making it on hot days when turning on the oven feels like a luxury I can’t afford, or when I need a dessert that comes together quickly but tastes like I fussed over it all afternoon. It’s honest, unpolished, and surprisingly forgiving—just like the best conversations around a table.
The secret here is the ricotta—its mild, slightly sweet flavor adds a gentle richness that’s different from traditional cheesecakes. It’s a reminder that sometimes, the simplest ingredients can become something unexpectedly satisfying. Plus, there’s a quiet joy in knowing I didn’t dirty a single pan, and I can have this chilled and ready in less than an hour, perfect for last-minute gatherings or a treat after a long day.
This recipe is about embracing the imperfect, rustic charm of a no-bake cheesecake made with ricotta—no oven required, just simple ingredients and a bit of patience. It’s perfect for those days when you want something creamy and satisfying without turning on the stove, especially in the heat of summer or after a busy week. It’s a reminder that sometimes, the best desserts are the easiest, yet most rewarding.
Rustic sweetness of ricotta
- Making this cheesecake feels like a small act of rebellion—no oven, no fuss, just good ingredients and a moment of calm.
- I love how the ricotta’s light, milky flavor reminds me of lazy Sunday mornings in Italy, simple and honest.
- There’s a quiet pride in pulling this together quickly, knowing it’s a comforting, imperfect creation that everyone devours.
- This recipe is a reminder that sometimes, the most satisfying desserts are the easiest ones, made with love and a little patience.
The story behind this recipe
- This recipe came about on a particularly humid summer day when I wanted something sweet but didn’t want to turn on the oven. I started thinking about all the times I’ve made ricotta toast or eaten it plain and wondered—what if I turned that mild, creamy cheese into a dessert? It’s simple, honest, and a little bit unexpected, which is exactly what I needed that afternoon.
- I remember pulling together this no-bake cheesecake in a rush, using ingredients I already had. The moment I tasted it, I was hooked—light, fluffy, with just enough tang from the ricotta to keep it interesting. It’s become a go-to for last-minute dinner parties or when I need a quick dessert that feels special without fuss.
- heading: ‘The story behind this recipe’
Historical & Cultural Tidbits
- Ricotta cheese has been a staple in Mediterranean cooking for centuries, often used in sweet and savory dishes alike.
- This no-bake cheesecake style gained popularity in Italy, where fresh, simple ingredients are celebrated and ovens aren’t always at the center of dessert making.
- The idea of skipping the oven in summer desserts dates back to rural kitchens, where simplicity and cooling techniques kept desserts manageable and refreshing.
Key ingredients at a glance
- Ricotta: I love how its mild, milky flavor brings a creamy, slightly sweet note; you can swap for mascarpone for a richer feel, but the texture will be denser and less airy.
- Cream: Heavy cream whips up to a fluffy cloud that supports the ricotta’s gentle texture; try coconut cream for a dairy-free version, though it’ll add a subtle coconut aroma.
- Sweetener: I prefer honey for a floral sweetness that’s not overpowering; maple syrup works too, offering a richer, caramel-like depth, but may alter the final color slightly.
- Lemon zest: Adds a fresh brightness that cuts through the richness; skip it if you want a more subdued flavor, but I think it’s what lifts the whole dessert.
- Graham cracker crust: Crunchy, buttery, and slightly sweet; you can substitute digestive biscuits or even graham cracker crumbs with a splash of cinnamon for added warmth.
- Vanilla extract: I love a good splash of vanilla for depth; vanilla bean paste is a luxe option, but plain extract will do if that’s what’s in the pantry.
- Optional toppings: Fresh berries or a drizzle of honey add contrast and freshness; try toasted nuts or a dusting of cocoa powder for different textures and flavors.
Spotlight on key ingredients
Ricotta:
- I love how its mild, milky flavor brings a creamy, slightly sweet note; you can swap for mascarpone for a richer feel, but the texture will be denser and less airy.
- Cream: Heavy cream whips up to a fluffy cloud that supports the ricotta’s gentle texture; try coconut cream for a dairy-free version, though it’ll add a subtle coconut aroma.
Lemon zest and crust:
- Lemon zest: Adds a fresh brightness that cuts through the richness; skip it if you want a more subdued flavor, but I think it’s what lifts the whole dessert.
- Crust: Crunchy, buttery, and slightly sweet; you can substitute digestive biscuits or even graham cracker crumbs with a splash of cinnamon for added warmth.
Notes for ingredient swaps
- Dairy-Free: Coconut ricotta or blended silken tofu can replace ricotta, though the flavor will be more neutral and less milky.
- Sweetener: Honey gives a floral note, but maple syrup or agave nectar work well for a richer, caramel undertone—just adjust sweetness accordingly.
- Cream: Coconut cream or cashew cream can substitute heavy cream; expect a slightly different texture and a touch of coconut flavor or nuttiness.
- Crust: Graham crackers can be swapped for digestive biscuits or crushed cookies; add a pinch of cinnamon or ginger for extra warmth.
- Lemon: Lemon zest brightens with a sharp, citrusy burst; lime zest or orange zest are good alternatives for different citrus nuances.
- Vanilla: Vanilla extract is versatile, but vanilla bean paste offers a more intense, aromatic flavor—use it for a deeper vanilla note.
- Toppings: Fresh berries are classic, but try caramelized figs or toasted nuts for richer textures and contrasting flavors.
Equipment & Tools
- Springform pan: To shape and hold the cheesecake while it sets.
- Mixing bowls: For combining ingredients separately and folding.
- Whisk: To aerate the whipped cream and mix ingredients smoothly.
- Spatula: For gentle folding and smoothing the batter.
- Electric mixer: To whip the cream efficiently and evenly.
Step-by-step guide to no-bake ricotta cheesecake
- Gather your equipment: a 20cm (8-inch) springform pan, a mixing bowl, a whisk, and a spatula. Line the bottom of the pan with parchment paper for easy removal.
- In a mixing bowl, combine 1 ½ cups (340g) ricotta cheese, ½ cup (60g) powdered sugar, and 1 teaspoon vanilla extract. Whisk until smooth and slightly fluffy, about 2 minutes.
- In a separate bowl, whip 1 cup (240ml) heavy cream until soft peaks form. This takes about 3-4 minutes with an electric mixer on medium-high speed. Be careful not to over-whip.
- Gently fold the whipped cream into the ricotta mixture in thirds. Use a spatula, folding carefully to keep the mixture airy. You want a light, creamy batter with no streaks.
- Prepare the crust: crush 150g graham crackers into fine crumbs. Mix with ¼ cup (60g) melted butter and a pinch of salt. Press this mixture evenly into the bottom of your prepared springform pan. Chill in the fridge for 10 minutes to set.
- Pour the ricotta mixture over the chilled crust. Smooth the top with the spatula. Cover with plastic wrap and refrigerate for at least 4 hours, preferably overnight, until set and firm to the touch.
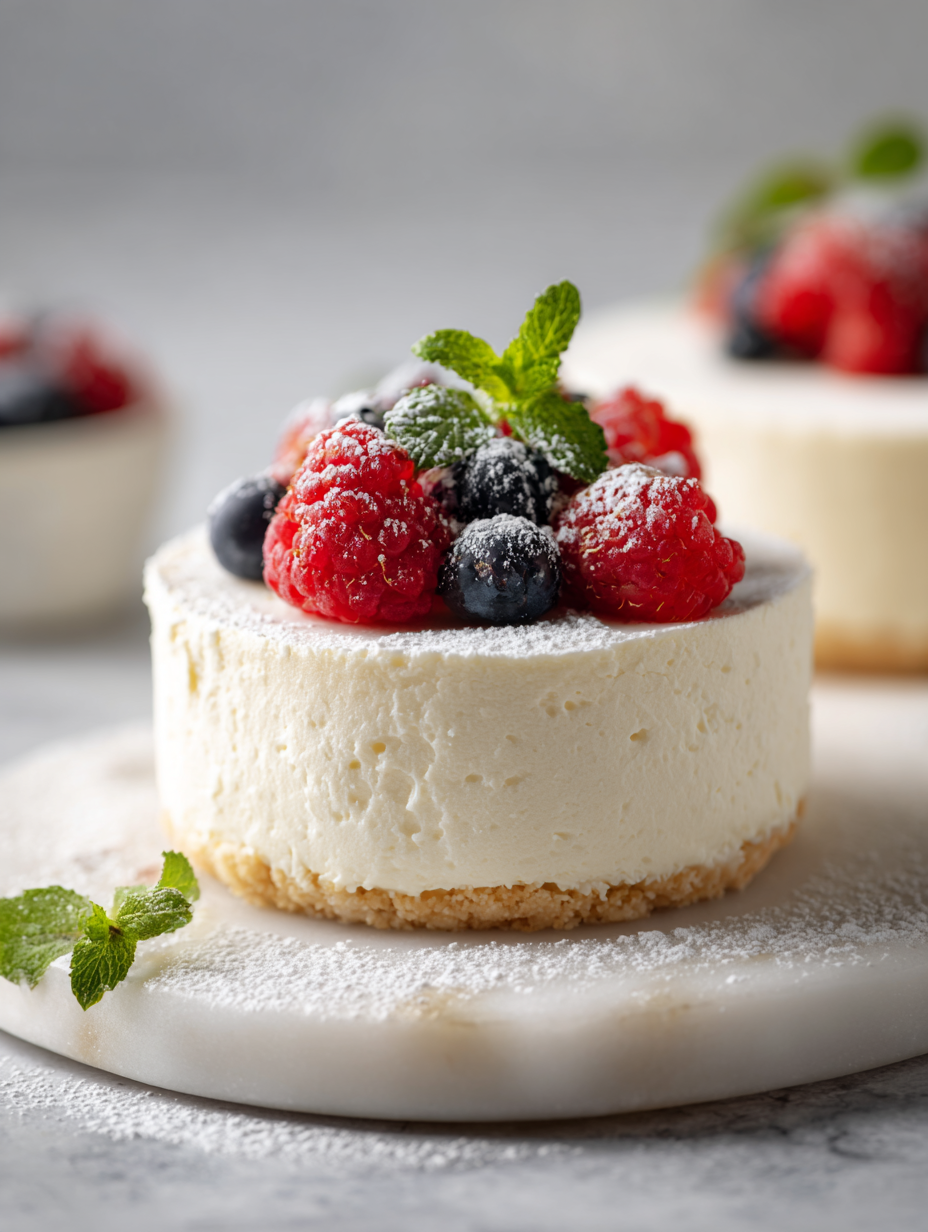
- Before serving, run a thin knife around the edge of the pan to loosen the cheesecake. Carefully remove the sides of the springform pan. Garnish with fresh berries or a drizzle of honey if desired.
- Rest the cheesecake in the fridge for another 30 minutes before slicing. Use a sharp, warm knife to cut clean slices. Serve cold for best texture and flavor.
Chill the assembled cheesecake in the fridge for at least 4 hours, ideally overnight. Before serving, run a knife around the edge to loosen, then carefully remove the sides of the springform pan. Garnish as desired and serve cold, sliced with a gentle, clean cut.
How to Know It’s Done
- Cheesecake is firm and slightly wobbly at the center when gently shaken.
- Edges look set, with no liquid or runny batter visible.
- Crust is crisp and holds together when pressed gently.
No-Bake Ricotta Cheesecake
Ingredients
Equipment
Method
- Line the bottom of your springform pan with parchment paper, then press the graham cracker crumbs mixed with melted butter and a pinch of salt evenly into the bottom to form a firm crust. Chill in the fridge for 10 minutes to set.
- In a mixing bowl, whisk together the ricotta cheese, powdered sugar, and vanilla extract until the mixture is smooth, creamy, and slightly fluffy, about 2 minutes.
- In a separate bowl, whip the heavy cream with an electric mixer until soft peaks form, which takes about 3-4 minutes. The cream should hold gentle peaks but not be stiff.
- Gently fold the whipped cream into the ricotta mixture in thirds, using a spatula. Carefully mix until just combined, maintaining the mixture’s airy texture and avoiding deflation.
- Pour the creamy filling over the chilled crust, smoothing the top with a spatula to create an even surface.
- Cover the pan with plastic wrap and refrigerate for at least 4 hours, or preferably overnight, until the cheesecake is firm and set.
- Once set, run a thin knife around the edge of the springform pan to loosen the sides, then carefully remove the pan’s sides.
- Garnish the top with fresh berries or a drizzle of honey for a burst of color and flavor, if desired.1 ½ cups ricotta cheese
- Slice with a warm, damp knife for clean, neat pieces, and serve chilled to enjoy the creamy, rustic texture.
Notes
Pro tips for perfect cheesecake
- Chill the crust thoroughly before adding the filling to help it set firmly and prevent sogginess.
- Gently fold whipped cream into the ricotta mixture to keep the light, airy texture intact.
- Use a warm, damp cloth to wipe your knife between slices for clean, neat cuts.
- Incorporate the lemon zest at the end of mixing to preserve its bright, aromatic oils.
- If the filling cracks during setting, lightly wiggle the pan; a slight jiggle means it’s perfectly set.
- For a more stable crust, press crumbs firmly into the pan and chill for 10 minutes before filling.
- Keep the cheesecake cold at all times; serve straight from the fridge to maintain perfect texture.
Common mistakes and how to fix them
- FORGOT to chill crust before adding filling → Chill crust for 10 minutes for better stability.
- DUMPED whipped cream too quickly → Fold gently to maintain airy texture; avoid vigorous stirring.
- OVER-TORCHED the crust → Bake at 180°C (350°F) for 8-10 minutes, watch for golden edges.
- MISSED the setting time → Chill at least 4 hours or overnight until firm and slightly jiggles.
Quick fixes and pantry swaps
- When mixture is too runny, splash in a bit more crushed biscuits to firm it up.
- If crust crumbles, patch with a light drizzle of melted butter and press again.
- Splash a little lemon juice on cracks to hide imperfections and brighten the look.
- Patch a cracked cheesecake with a thin layer of whipped cream for a fresh look.
- Shield edges with foil if they brown too quickly during fridge chilling.
Prep, store, and reheat tips
- Prepare the cheesecake base and filling the day before; it benefits from a slow chill to develop flavor and texture.
- Wrap the assembled cheesecake tightly with plastic wrap and store in the fridge for up to 24 hours; it will stay creamy and fresh.
- For best results, serve within 24-48 hours; the ricotta flavor mellows slightly, and the texture remains light and airy.
- Refrigerate leftovers in an airtight container; consume within 2 days for optimal freshness and sensory quality.
- To reheat or soften slightly, let the cheesecake sit at room temperature for 10-15 minutes—notice the subtle, creamy aroma emerge.
Top questions about no bake ricotta cheesecake
1. Can I substitute the ricotta with other cheeses?
You can use mascarpone or cream cheese as a richer alternative, but the texture may be less airy and slightly denser.
2. How long should I chill the cheesecake?
Yes, the cheesecake sets best when chilled for at least 4 hours, but overnight is ideal for full firmness.
3. How can I boost the flavor of the filling?
Add a touch more lemon zest or vanilla to enhance flavor, especially if your ricotta is mild or bland.
4. How do I get neat slices?
Use a warm, damp cloth to wipe your knife after each slice for cleaner cuts and less sticking.
5. What if my filling is too soft?
If the filling is too runny, fold in extra crushed graham crackers or freeze the cheesecake briefly to firm it up.
6. Are dairy-free options possible?
You can replace heavy cream with coconut cream or cashew cream for dairy-free options, but expect a different texture.
7. What equipment do I need?
Using a springform pan helps shape and remove the cheesecake easily. Line it with parchment for extra ease.
8. How do I keep the crust from getting soggy?
Chill the crust in the fridge for 10 minutes before adding the filling to help it stay crisp and stable.
9. Can I prepare this in advance?
Yes, the cheesecake can be made a day ahead. Keep it covered in the fridge and add toppings just before serving.
10. How do I fix cracks or imperfections?
If cracks appear, lightly wiggle the pan or smooth the surface with a spatula. Topping with berries can hide imperfections.
This no-bake ricotta cheesecake is a quiet reminder that sometimes, simplicity carries the most charm. It’s a dish that comes together quickly, yet feels unexpectedly indulgent, especially when you notice that gentle, milky aroma as it sets in the fridge. No fuss, no oven—just honest ingredients and a moment to enjoy them.
In a season when light, fresh desserts feel right, this recipe offers a cozy bit of sweetness that’s easy to pull off at the last minute. It’s not about perfection but about embracing the imperfect, creamy, slightly rustic joy of something made with love—and just enough patience.

Hi, I’m Madison Lane, the cook, recipe creator, and heart behind this kitchen. Food has been part of my life for as long as I can remember. Some of my earliest memories are of standing beside my dad while he cooked, watching him move comfortably around the kitchen, tasting sauces, and explaining why patience mattered just as much as seasoning.
